Ceph搭建
一、系统环境初始化
时间同步
关闭selinux和防火墙(Centos)
配置主机域名解析或通过DNS解析
所有节点安装podman
apt install -y podman lvm2
| 主机名 | ip | |
|---|---|---|
| ceph1 | 192.168.11.10 \ | 192.168.75.10 |
| ceph2 | 192.168.11.11 \ | 192.168.75.11 |
| ceph3 | 192.168.11.12 \ | 192.168.75.12 |
root@ceph3:~# cat /etc/hosts
127.0.0.1 localhost

# The following lines are desirable for IPv6 capable hosts
::1     ip6-localhost ip6-loopback
fe00::0 ip6-localnet
ff00::0 ip6-mcastprefix
ff02::1 ip6-allnodes
ff02::2 ip6-allrouters
192.168.11.10 ceph1
192.168.11.11 ceph2
192.168.11.12 ceph3
配置时间同步 使用自带的timedate
timedatectl set-timezone Asia/Shanghai
二、部署RADOS集群
https://mirrors.aliyun.com/ceph/
https://mirrors.163.com/ceph/
https://mirrors.tuna.tsinghua.edu.cn/ceph/
2.1仓库准备
各节点配置ceph 仓库
aliyun默认带了ceph
root@ceph3:~# apt-cache madison ceph
      ceph | 19.2.3-0ubuntu0.24.04.3 | http://mirrors.aliyun.com/ubuntu noble-updates/main amd64 Packages
      ceph | 19.2.3-0ubuntu0.24.04.3 | http://mirrors.aliyun.com/ubuntu noble-security/main amd64 Packages
      ceph | 19.2.0~git20240301.4c76c50-0ubuntu6 | http://mirrors.aliyun.com/ubuntu noble/main amd64 Packages
root@ceph3:~#
2. 2安装 Cephadm(仅在主节点 ceph1)
apt update
apt install -y podman lvm2
apt install -y cephadm
初始化主节点
root@ceph1:~# cephadm bootstrap --mon-ip 192.168.11.10
Creating directory /etc/ceph for ceph.conf
Verifying podman|docker is present...
Verifying lvm2 is present...
Verifying time synchronization is in place...
Unit systemd-timesyncd.service is enabled and running
Repeating the final host check...
podman (/usr/bin/podman) version 4.9.3 is present
systemctl is present
lvcreate is present
Unit systemd-timesyncd.service is enabled and running
Host looks OK
Cluster fsid: 24f2c24c-75e6-11f1-b8f1-000c291acd7f
Verifying IP 192.168.11.10 port 3300 ...
Verifying IP 192.168.11.10 port 6789 ...
Mon IP `192.168.11.10` is in CIDR network `192.168.11.0/24`
Mon IP `192.168.11.10` is in CIDR network `192.168.11.0/24`
Internal network (--cluster-network) has not been provided, OSD replication will default to the public_network
Pulling container image quay.io/ceph/ceph:v19...
Ceph version: ceph version 19.2.4 (7cc0193a616a3333d22b7762037fa5b73a4d06a6) squid (stable)
Extracting ceph user uid/gid from container image...
Creating initial keys...
Creating initial monmap...
Creating mon...
Waiting for mon to start...
Waiting for mon...
mon is available
Assimilating anything we can from ceph.conf...
Generating new minimal ceph.conf...
Restarting the monitor...
Setting public_network to 192.168.11.0/24 in mon config section
Wrote config to /etc/ceph/ceph.conf
Wrote keyring to /etc/ceph/ceph.client.admin.keyring
Creating mgr...
Verifying port 0.0.0.0:9283 ...
Verifying port 0.0.0.0:8765 ...
Verifying port 0.0.0.0:8443 ...
Waiting for mgr to start...
Waiting for mgr...
mgr not available, waiting (1/15)...
mgr not available, waiting (2/15)...
mgr not available, waiting (3/15)...
mgr is available
Enabling cephadm module...
Waiting for the mgr to restart...
Waiting for mgr epoch 5...
mgr epoch 5 is available
Setting orchestrator backend to cephadm...
Generating ssh key...
Wrote public SSH key to /etc/ceph/ceph.pub
Adding key to root@localhost authorized_keys...
Adding host ceph1...
Deploying mon service with default placement...
Deploying mgr service with default placement...
Deploying crash service with default placement...
Deploying ceph-exporter service with default placement...
Deploying prometheus service with default placement...
Deploying grafana service with default placement...
Deploying node-exporter service with default placement...
Deploying alertmanager service with default placement...
Enabling the dashboard module...
Waiting for the mgr to restart...
Waiting for mgr epoch 9...
mgr epoch 9 is available
Generating a dashboard self-signed certificate...
Creating initial admin user...
Fetching dashboard port number...
Ceph Dashboard is now available at:

             URL: https://ceph1:8443/
            User: admin
        Password: 5vcur62785

Enabling client.admin keyring and conf on hosts with "admin" label
Saving cluster configuration to /var/lib/ceph/24f2c24c-75e6-11f1-b8f1-000c291acd7f/config directory
You can access the Ceph CLI as following in case of multi-cluster or non-default config:

        sudo /usr/sbin/cephadm shell --fsid 24f2c24c-75e6-11f1-b8f1-000c291acd7f -c /etc/ceph/ceph.conf -k /etc/ceph/ceph.client.admin.keyring

Or, if you are only running a single cluster on this host:

        sudo /usr/sbin/cephadm shell

Please consider enabling telemetry to help improve Ceph:

        ceph telemetry on

For more information see:

        https://docs.ceph.com/en/latest/mgr/telemetry/

Bootstrap complete.
此命令将
- 在本地主机上为新集群创建一个 Monitor 和一个 Manager 守护程序。
- 为 Ceph 集群生成一个新的 SSH 密钥,并将其添加到 root 用户的
/root/.ssh/authorized_keys文件中。- 将公钥副本写入
/etc/ceph/ceph.pub。- 将最小配置文件写入
/etc/ceph/ceph.conf。此文件是与 Ceph 守护程序通信所必需的。- 将
client.admin管理(特权!)密钥副本写入/etc/ceph/ceph.client.admin.keyring。- 将
_admin标签添加到引导主机。默认情况下,任何具有此标签的主机都将(也)获得/etc/ceph/ceph.conf和/etc/ceph/ceph.client.admin.keyring的副本。
免密失败了 /etc/ceph/ceph.pub
ssh-keygen
重新初始化
root@ceph1:~# cephadm bootstrap \
  --mon-ip 192.168.11.10 \
  --ssh-private-key /root/.ssh/id_ed25519 \
  --ssh-public-key /root/.ssh/id_ed25519.pub \
  --allow-overwrite
Verifying podman|docker is present...
Verifying lvm2 is present...
Verifying time synchronization is in place...
Unit systemd-timesyncd.service is enabled and running
Repeating the final host check...
podman (/usr/bin/podman) version 4.9.3 is present
systemctl is present
lvcreate is present
Unit systemd-timesyncd.service is enabled and running
Host looks OK
Cluster fsid: 10b97a6a-75ef-11f1-8612-000c291acd7f
Verifying IP 192.168.11.10 port 3300 ...
Verifying IP 192.168.11.10 port 6789 ...
Mon IP `192.168.11.10` is in CIDR network `192.168.11.0/24`
Mon IP `192.168.11.10` is in CIDR network `192.168.11.0/24`
Internal network (--cluster-network) has not been provided, OSD replication will default to the public_network
Pulling container image quay.io/ceph/ceph:v19...
Ceph version: ceph version 19.2.4 (7cc0193a616a3333d22b7762037fa5b73a4d06a6) squid (stable)
Extracting ceph user uid/gid from container image...
Creating initial keys...
Creating initial monmap...
Creating mon...
Waiting for mon to start...
Waiting for mon...
mon is available
Assimilating anything we can from ceph.conf...
Generating new minimal ceph.conf...
Restarting the monitor...
Setting public_network to 192.168.11.0/24 in mon config section
Wrote config to /etc/ceph/ceph.conf
Wrote keyring to /etc/ceph/ceph.client.admin.keyring
Creating mgr...
Verifying port 0.0.0.0:9283 ...
Verifying port 0.0.0.0:8765 ...
Verifying port 0.0.0.0:8443 ...
Waiting for mgr to start...
Waiting for mgr...
mgr not available, waiting (1/15)...
mgr not available, waiting (2/15)...
mgr not available, waiting (3/15)...
mgr is available
Enabling cephadm module...
Waiting for the mgr to restart...
Waiting for mgr epoch 5...
mgr epoch 5 is available
Setting orchestrator backend to cephadm...
Using provided ssh keys...
Adding key to root@localhost authorized_keys...
Adding host ceph1...
Deploying mon service with default placement...
Deploying mgr service with default placement...
Deploying crash service with default placement...
Deploying ceph-exporter service with default placement...
Deploying prometheus service with default placement...
Deploying grafana service with default placement...
Deploying node-exporter service with default placement...
Deploying alertmanager service with default placement...
Enabling the dashboard module...
Waiting for the mgr to restart...
Waiting for mgr epoch 9...
mgr epoch 9 is available
Generating a dashboard self-signed certificate...
Creating initial admin user...
Fetching dashboard port number...
Ceph Dashboard is now available at:

             URL: https://ceph1:8443/
            User: admin
        Password: tvhp9krki9

Enabling client.admin keyring and conf on hosts with "admin" label
Saving cluster configuration to /var/lib/ceph/10b97a6a-75ef-11f1-8612-000c291acd7f/config directory
You can access the Ceph CLI as following in case of multi-cluster or non-default config:

        sudo /usr/sbin/cephadm shell --fsid 10b97a6a-75ef-11f1-8612-000c291acd7f -c /etc/ceph/ceph.conf -k /etc/ceph/ceph.client.admin.keyring

Or, if you are only running a single cluster on this host:

        sudo /usr/sbin/cephadm shell

Please consider enabling telemetry to help improve Ceph:

        ceph telemetry on

For more information see:

        https://docs.ceph.com/en/latest/mgr/telemetry/

Bootstrap complete.
2.3 安装 Ceph 命令行工具
为了方便直接在终端输入 ceph 命令,在 ceph1 上安装客户端:
root@ceph1:~# apt install -y ceph-common
三、编排三节点集群
3.1 允许主节点免密登录其他节点
Cephadm 需要通过 SSH 管理 ceph2 和 ceph3。
3.2 将主机加入集群
在 node1 上执行命令,把其他两个 Ubuntu 节点拉进集群:
Bash
root@ceph1:~# ceph orch host add ceph2 192.168.11.11
Added host 'ceph2' with addr '192.168.11.11'
root@ceph1:~# ceph orch host add ceph3 192.168.11.12
Added host 'ceph3' with addr '192.168.11.12'
验证节点状态:ceph orch host ls
root@ceph1:~# ceph orch host ls
HOST   ADDR           LABELS  STATUS
ceph1  192.168.11.10  _admin
ceph2  192.168.11.11
ceph3  192.168.11.12
3 hosts in cluster
4. 部署高可用组件(Mon & Mgr)
为了让 3 个节点对等且具备高可用性,将 Monitor 和 Manager 拓扑应用到所有节点:
# 让 3 个节点都运行 mon
root@ceph1:~# ceph orch apply mon --placement="3 ceph1 ceph2 ceph3"
Scheduled mon update...

# 让 3 个节点都运行 mgr
root@ceph1:~# ceph orch apply mgr --placement="3 ceph1 ceph2 ceph3"
Scheduled mgr update...
5. 添加 OSD(存储裸盘)
确保你准备用于存储数据的硬盘没有分区表,没有被挂载过。
5.1 检查可用硬盘
root@ceph1:~# ceph orch device ls
HOST   PATH      TYPE  DEVICE ID                                             SIZE  AVAILABLE  REFRESHED  REJECT REASONS
ceph1  /dev/sdb  hdd                                                        40.0G  Yes        15m ago
ceph1  /dev/sr0  hdd   VMware_Virtual_SATA_CDRW_Drive_01000000000000000001  1023M  No         15m ago    Failed to determine if device is BlueStore, Insufficient space (<5GB)
ceph2  /dev/sdb  hdd                                                        40.0G  Yes        4m ago
ceph2  /dev/sr0  hdd   VMware_Virtual_SATA_CDRW_Drive_01000000000000000001  1023M  No         4m ago     Failed to determine if device is BlueStore, Insufficient space (<5GB)
ceph3  /dev/sdb  hdd                                                        40.0G  Yes        5s ago
ceph3  /dev/sr0  hdd   VMware_Virtual_SATA_CDRW_Drive_01000000000000000001  1023M  No         5s ago     Failed to determine if device is BlueStore, Insufficient space (<5GB)
root@ceph1:~#
如果看到各节点的硬盘(如 /dev/sdb)状态为 Available: Insufficient space (0B) 或 False,说明盘不干净,需要用 wipefs -a /dev/sdb 清理。
5.2 自动挂载所有可用裸盘
ceph orch apply osd --all-available-devices
6. 完工检查
在 node1 上输入:
root@ceph1:~# ceph -s
  cluster:
    id:     10b97a6a-75ef-11f1-8612-000c291acd7f
    health: HEALTH_OK

  services:
    mon: 3 daemons, quorum ceph1,ceph3,ceph2 (age 7m)
    mgr: ceph1.uwzqip(active, since 25m), standbys: ceph3.ftoasw, ceph2.wevbmh
    osd: 3 osds: 3 up (since 5m), 3 in (since 5m)

  data:
    pools:   1 pools, 1 pgs
    objects: 2 objects, 449 KiB
    usage:   81 MiB used, 120 GiB / 120 GiB avail
    pgs:     1 active+clean
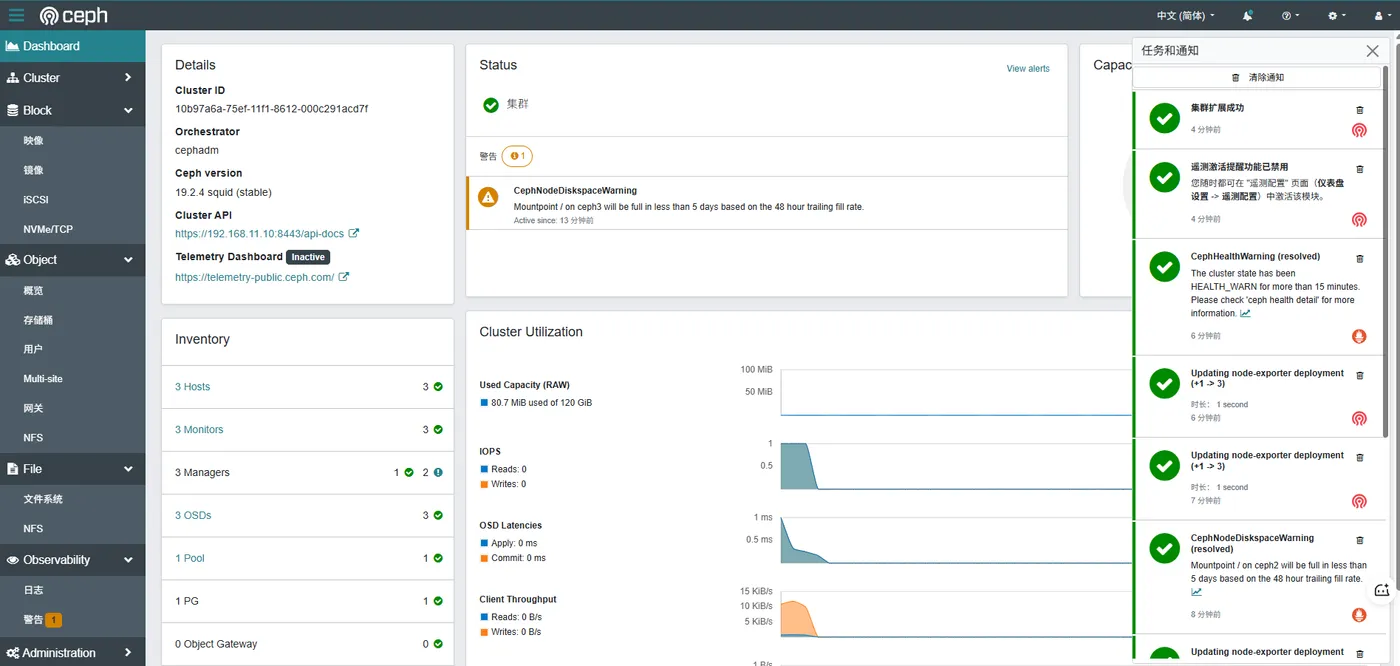
只要看到 health: HEALTH_OK,且 mon 和 mgr 的数量都显示为 3,三节点 Ceph 集群就已经搭建成功了!