创建Mapper层、Service层和Controller层
根据item表的字段来创建Item实体类,新建entity包增加Item实体类
@Data
public class Item {
    private Integer id;
    private String name;
    private Double price;
    private String pic;
    private Date createTime;
    private String detail;
}
复制代码
创建ItemMapper接口,新增mapper文件夹以及ItemMapper接口
public interface ItemMapper {
}
复制代码
在resources目录下创建MyBatis全局配置文件
<?xml version="1.0" encoding="UTF-8"?>
<!DOCTYPE configuration
        PUBLIC "-//mybatis.org//DTD Config 3.0//EN"
        "http://mybatis.org/dtd/mybatis-3-config.dtd">
<configuration>
    <settings>
        <!--开启驼峰命名-->
        <setting name="mapUnderscoreToCamelCase" value="true"/>
    </settings>
</configuration>
复制代码
在resources目录下常见mappers文件夹,在mappers中创建MyBatis SQL Mapper XML文件
<?xml version="1.0" encoding="UTF-8"?>
<!DOCTYPE mapper
        PUBLIC "-//mybatis.org//DTD Mapper 3.0//EN"
        "http://mybatis.org/dtd/mybatis-3-mapper.dtd">
<mapper namespace="com.lilith.mapper.ItemMapper">
</mapper>
复制代码
在resources目录下创建数据库连接配置文件db.properties
jdbc_driver=com.mysql.cj.jdbc.Driver
jdbc_url=jdbc:mysql://localhost:3306/test?useUnicode=true&characterEncoding=utf8&autoReconnect=true&useSSL=false&serverTimezone=Asia/Shanghai
jdbc_username=root
jdbc_password=root
复制代码
在resources目录下创建logback.xml配置文件,用于打印执行的SQL
<?xml version="1.0" encoding="UTF-8"?>
<configuration>
   <appender name="console" class="ch.qos.logback.core.ConsoleAppender">
       <encoder>
           <pattern>[%thread] %d{HH:mm:ss.SSS} %-5level %logger{36} - %msg%n</pattern>
       </encoder>
   </appender>
    <root level="debug">
        <appender-ref ref="console"/>
    </root>
</configuration>
复制代码
在WEB-INF下创建Spring MVC配置文件dispatcherServlet-servlet.xml
<?xml version="1.0" encoding="UTF-8"?>
<beans xmlns="http://www.springframework.org/schema/beans"
       xmlns:xsi="http://www.w3.org/2001/XMLSchema-instance"
       xmlns:util="http://www.springframework.org/schema/util"
       xmlns:p="http://www.springframework.org/schema/p" xmlns:context="http://www.springframework.org/schema/context"
       xmlns:aop="http://www.springframework.org/schema/aop" xmlns:mvc="http://www.springframework.org/schema/mvc"
       xsi:schemaLocation="http://www.springframework.org/schema/beans
        https://www.springframework.org/schema/beans/spring-beans.xsd
        http://www.springframework.org/schema/util
        http://www.springframework.org/schema/util/spring-util-4.3.xsd http://www.springframework.org/schema/context https://www.springframework.org/schema/context/spring-context.xsd http://www.springframework.org/schema/aop https://www.springframework.org/schema/aop/spring-aop.xsd http://www.springframework.org/schema/mvc https://www.springframework.org/schema/mvc/spring-mvc.xsd">
    <context:component-scan base-package="com.lilith" use-default-filters="false">
        <context:include-filter type="annotation" expression="org.springframework.stereotype.Controller"/>
    </context:component-scan>
    <!--配置试图解析器,自动拼接页面地址,自动在jsp页面前增加/WEB-INF/pages/-->
    <bean id="internalResourceViewResolver" class="org.springframework.web.servlet.view.InternalResourceViewResolver">
        <property name="prefix" value="/WEB-INF/pages/"></property>
        <property name="suffix" value=".jsp"></property>
    </bean>
    <!-- 默认前端控制器是拦截所有资源(除过jsp),js文件就404了;要js文件的请求是交给tomcat处理的 -->
    <!-- 告诉SpringMVC,自己映射的请求就自己处理,不能处理的请求直接交给tomcat -->
    <!-- 静态资源能访问,动态映射的请求就不行 -->
    <mvc:default-servlet-handler/>
    <!-- springmvc可以保证动态请求和静态请求都能访问 -->
    <mvc:annotation-driven></mvc:annotation-driven>
</beans>
复制代码
在resources目录下创建Spring配置文件application.xml
<?xml version="1.0" encoding="UTF-8"?>
<beans xmlns="http://www.springframework.org/schema/beans"
       xmlns:xsi="http://www.w3.org/2001/XMLSchema-instance"
       xmlns:util="http://www.springframework.org/schema/util"
       xmlns:p="http://www.springframework.org/schema/p" xmlns:context="http://www.springframework.org/schema/context"
       xmlns:tx="http://www.springframework.org/schema/tx" xmlns:jdbc="http://www.springframework.org/schema/jdbc"
       xsi:schemaLocation="http://www.springframework.org/schema/beans
        https://www.springframework.org/schema/beans/spring-beans.xsd
        http://www.springframework.org/schema/util
        http://www.springframework.org/schema/util/spring-util-4.3.xsd http://www.springframework.org/schema/context https://www.springframework.org/schema/context/spring-context.xsd http://www.alibaba.com/schema/stat http://www.alibaba.com/schema/stat.xsd http://www.springframework.org/schema/tool http://www.springframework.org/schema/tool/spring-tool.xsd http://www.springframework.org/schema/tx http://www.springframework.org/schema/tx/spring-tx.xsd http://www.springframework.org/schema/jdbc http://www.springframework.org/schema/jdbc/spring-jdbc.xsd">
    <!--扫描除了控制器之前的其他包-->
    <context:component-scan base-package="com.lilith">
        <context:exclude-filter type="annotation" expression="org.springframework.stereotype.Controller"/>
    </context:component-scan>
    <!--引用外部配置文件-->
    <context:property-placeholder location="classpath:db.properties"></context:property-placeholder>
    <!--数据库连接池配置-->
    <bean id="dataSource" class="com.alibaba.druid.pool.DruidDataSource">
        <property name="driverClassName" value="${jdbc_driver}"/>
        <property name="url" value="${jdbc_url}" />
        <property name="username" value="${jdbc_username}"/>
        <property name="password" value="${jdbc_password}"/>
        <!--<property name="initialSize" value="${jdbc_initialSize}"/>-->
        <!--<property name="maxActive" value="${jdbc_maxActive}"/>-->
    </bean>
    <bean id="sqlSessionFactoryBean" class="org.mybatis.spring.SqlSessionFactoryBean">
        <property name="configLocation" value="classpath:mybatis-config.xml"></property>
        <property name="dataSource" ref="dataSource"></property>
        <property name="mapperLocations" value="classpath:/mappers/*.xml"></property>
    </bean>
    <!--mapper层接口加入到Spring容器-->
    <bean id="mapperScannerConfigurer" class="org.mybatis.spring.mapper.MapperScannerConfigurer">
        <!--指定接口所在的包-->
        <property name="basePackage" value="com.lilith.mapper"></property>
    </bean>
</beans>
复制代码
配置web.xml
<?xml version="1.0" encoding="UTF-8"?>
<web-app xmlns="http://xmlns.jcp.org/xml/ns/javaee"
         xmlns:xsi="http://www.w3.org/2001/XMLSchema-instance"
         xsi:schemaLocation="http://xmlns.jcp.org/xml/ns/javaee http://xmlns.jcp.org/xml/ns/javaee/web-app_4_0.xsd"
         version="4.0">
    <!--Spring-->
    <context-param>
        <param-name>contextConfigLocation</param-name>
        <param-value>classpath:application.xml</param-value>
    </context-param>
    <listener>
        <listener-class>org.springframework.web.context.ContextLoaderListener</listener-class>
    </listener>
    <!--DispatchServlet-->
    <servlet>
        <servlet-name>dispatcherServlet</servlet-name>
        <servlet-class>org.springframework.web.servlet.DispatcherServlet</servlet-class>
        <load-on-startup>0</load-on-startup>
    </servlet>
    <servlet-mapping>
        <servlet-name>dispatcherServlet</servlet-name>
        <!--"/" 代表拦截所有请求,/*拦截所有请求包括jsp页面这些请求-->
        <url-pattern>/</url-pattern>
    </servlet-mapping>
    <!--解决POST请求中文乱码问题-->
    <filter>
        <filter-name>characterFilter</filter-name>
        <filter-class>org.springframework.web.filter.CharacterEncodingFilter</filter-class>
        <init-param>
            <param-name>encoding</param-name>
            <param-value>UTF-8</param-value>
        </init-param>
    </filter>
    <filter-mapping>
        <filter-name>characterFilter</filter-name>
        <url-pattern>/*</url-pattern>
    </filter-mapping>
    <!--Rest支持-->
    <filter>
        <filter-name>hiddenHttpMethodFilter</filter-name>
        <filter-class>org.springframework.web.filter.HiddenHttpMethodFilter</filter-class>
    </filter>
    <filter-mapping>
        <filter-name>hiddenHttpMethodFilter</filter-name>
        <url-pattern>/*</url-pattern>
    </filter-mapping>
</web-app>
复制代码
在ItemMapper中新增insert和selectById两个方法
public interface ItemMapper {
    void insert(Item item);
    Item selectById(Integer id);
}
复制代码
在ItemMapper XML文件中增加对应的SQL语句,在mapper标签下新增以下内容
<sql id="itemColumsWithoutId">
    name,price,pic,create_time,detail
</sql>
<sql id="itemColums">
    id,name,price,pic,create_time,detail
</sql>
<insert id="insert" useGeneratedKeys="true" keyColumn="id" keyProperty="id">
    INSERT item
    (<include refid="itemColumsWithoutId" />)
    VALUES (#{name},#{price},#{pic},#{createTime},#{detail})
</insert>
<select id="selectById" resultType="com.lilith.entity.Item">
    SELECT
    <include refid="itemColums"></include>
    FROM item
    WHERE id=#{id}
</select>
复制代码
增加ItemMapperTest测试类,对方法进行测试
@RunWith(SpringJUnit4ClassRunner.class)
@ContextConfiguration(locations = "classpath:application.xml")
public class ItemMapperTest {
    @Autowired
    private ItemMapper itemMapper;
    @Test
    public void insert() {
        for (int i = 10; i < 20; i++) {
            Item item = new Item();
            item.setName("Mark " + i);
            item.setPrice(12.0);
            item.setDetail("IRON MAN ARMY");
            item.setCreateTime(new Date());
            itemMapper.insert(item);
        }
    }
    @Test
    public void selectById() {
        Item item = itemMapper.selectById(18);
        System.out.println("查询到的数据为:" + item);
    }
}
复制代码
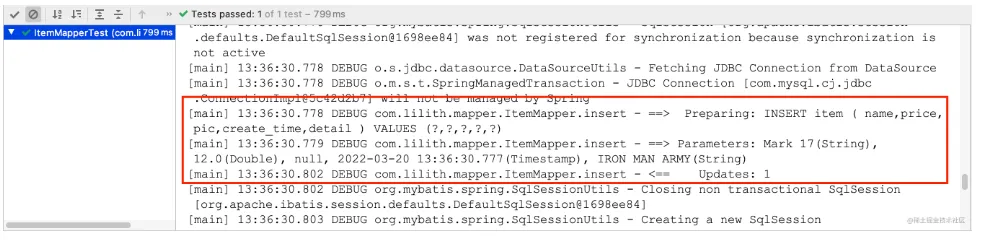
测试insert方法
测试selectById方法
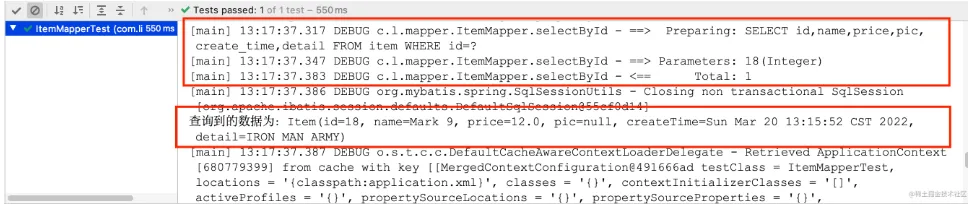
新增ItemService接口及实现类
public interface ItemService {
    void save(Item item);
    Item findById(Integer id);
}
复制代码
@Service
public class ItemServiceImpl implements ItemService {
    @Autowired
    private ItemMapper itemMapper;
    @Override
    public void save(Item item) {
        itemMapper.insert(item);
    }
    @Override
    public Item findById(Integer id) {
        return itemMapper.selectById(id);
    }
}
复制代码
service层配置切面和事务通知,在application.xml中增加配置
<!--配置事务通知-->
<tx:advice id="advice" transaction-manager="dataSourceTransactionManager">
    <tx:attributes>
        <tx:method name="save*" propagation="REQUIRED"/>
        <tx:method name="update*" propagation="REQUIRED"/>
        <tx:method name="delete*" propagation="REQUIRED"/>
        <tx:method name="find*" read-only="true" />
        <tx:method name="*" propagation="REQUIRED"/>
    </tx:attributes>
</tx:advice>
<!--配置切面-->
<aop:config>
    <aop:pointcut id="pointcut" expression="execution(* com.lilith.service.impl.*.*(..))"/>
    <aop:advisor advice-ref="advice" pointcut-ref="pointcut" />
</aop:config>
复制代码
生成ItemServiceTest测试类
@RunWith(SpringJUnit4ClassRunner.class)
@ContextConfiguration(locations = "classpath:application.xml")
public class ItemServiceTest {
    @Autowired
    private ItemService itemService;
    @Test
    public void save() {
        Item item = new Item();
        item.setName("电脑");
        item.setPrice(9999.0);
        item.setCreateTime(new Date());
        itemService.save(item);
    }
    @Test
    public void findById() {
        Item item = itemService.findById(20);
        System.out.println("itemService查询到的数据为:" + item);
    }
}
复制代码
测试save方法
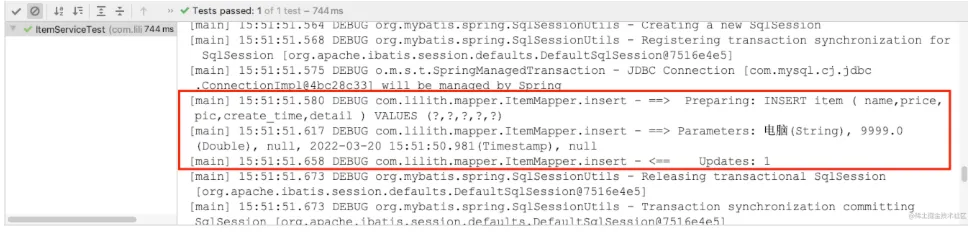
测试findById方法
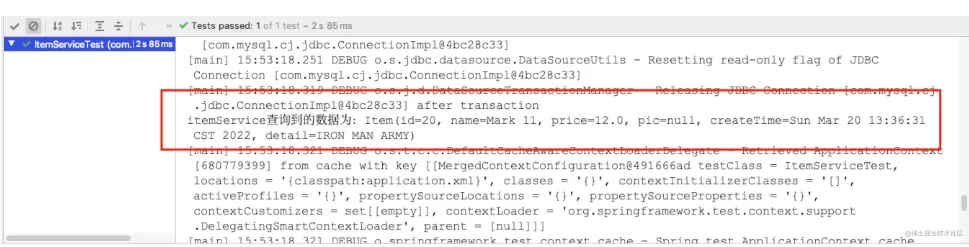
编写ItemController
@Controller
@RequestMapping("/item")
public class ItemController {
    @Autowired
    private ItemService itemService;
    @GetMapping("/{id}")
    public String getItem(@PathVariable("id") Integer id, Model model){
        Item item = itemService.findById(id);
        model.addAttribute("item",item);
        return "item";
    }
}
复制代码
在WEB-INF下创建pages文件夹,新增item.jsp页面
<%@ page language="java" contentType="text/html; charset=UTF-8"
         pageEncoding="UTF-8"%>
<%@ taglib uri="http://java.sun.com/jsp/jstl/core" prefix="c" %>
<%@ taglib uri="http://java.sun.com/jsp/jstl/fmt"  prefix="fmt"%>
<!DOCTYPE html PUBLIC "-//W3C//DTD HTML 4.01 Transitional//EN" "http://www.w3.org/TR/html4/loose.dtd">
<html>
<head>
    <meta http-equiv="Content-Type" content="text/html; charset=UTF-8">
    <title>Insert title here</title>
</head>
<body>
<form>
    <table width="100%" border=1>
        <tr>
            <td>商品名称</td>
            <td> ${item.name } </td>
        </tr>
        <tr>
            <td>商品价格</td>
            <td> ${item.price } </td>
        </tr>
        <tr>
            <td>生成日期</td>
            <td> <fmt:formatDate value="${item.createTime}" pattern="yyyy-MM-dd HH:mm:ss"/> </td>
        </tr>
        <tr>
            <td>商品简介</td>
            <td>${item.detail} </td>
        </tr>
    </table>
</form>
</body>
</html>
复制代码
在Project Structure的Artifacts目录下将右侧的jar包全部导入左侧的新建的lib目录下
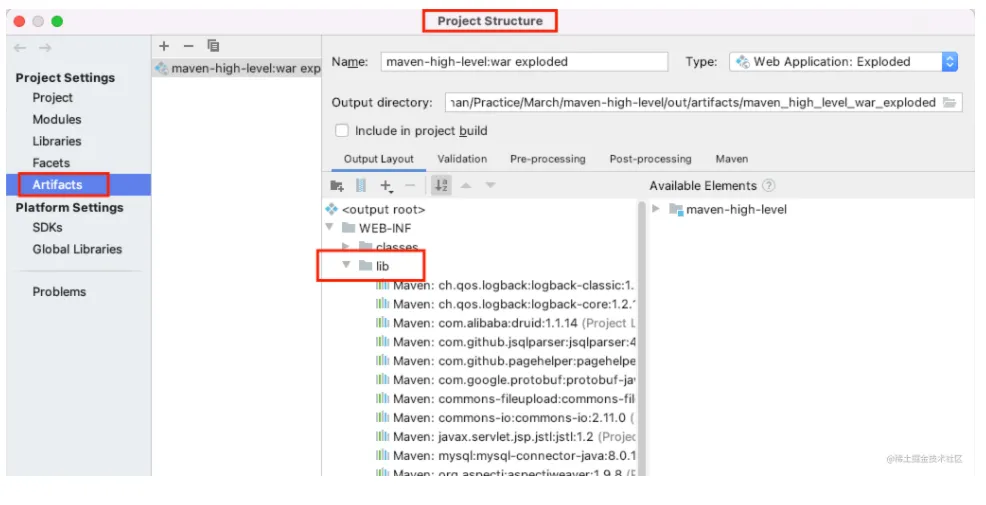
配置Tomcat并启动,浏览器输入地址 http://localhost:8080/item/20

成功查询到数据并显示在页面上