注:本文是【ASP.NET Web API系列教程】的一部分,如果您是第一次看本博客文章,请先看前面的内容。
2.4 Creating a Help Page for a Web API
2.4 创建Web API帮助页面
本文引自:http://www.asp.net/web-api/overview/creating-web-apis/creating-a-help-page-for-a-web-api
By Mike Wasson | August 3, 2012
作者:Mike Wasson | 日期:2012-8-3
This tutorial shows how to create a help page for a web API, by using the ApiExplorer class.
本教程展示如何运用ApiExplorer类为Web API创建帮助页面。
The ApiExplorer class provides descriptive information about the APIs exposed by a web API. ApiExplorer provides the raw material that you can use to create a help page. The ApiExplorer contains an ApiDescription collection, one for each API that it discovers in your project. For this purpose, an "API" is defined as the combination of HTTP method and relative URI. For example, here are some distinct APIs:
ApiExplorer类对Web API所暴露的每个API提供了描述信息。(因此,)ApiExplorer提供了可以用来创建帮助页面的原始材料。ApiExplorer含有一个ApiDescription集合,一个在你项目中发现的每个API的集合。为此,所谓一个“API”的定义是一个HTTP方法与相关URI的结合。例如,以下是一些不同的API:
- GET /api/Products(HTTP方法是GET,URI是/api/Products,两者的结合便是一个API。下同 — 译者注)
- GET /api/Products/{id}
- POST /api/Products
If a single controller action supports multiple HTTP methods, the ApiExplorer treats each as a distinct API.
如果一个单一的控制器动作支持多个HTTP方法,ApiExplorer会把每一个都作为不同的API看待。
For this tutorial, we will create the help page as an MVC view, using Razor syntax to render the HTML. First, create a new project using the "Web API" project template.
对于本教程,我们将把帮助页面创建成一个MVC视图,用Razor语法来渲染HTML。首先用“Web API”项目模板创建一个新项目(如图2-27)。
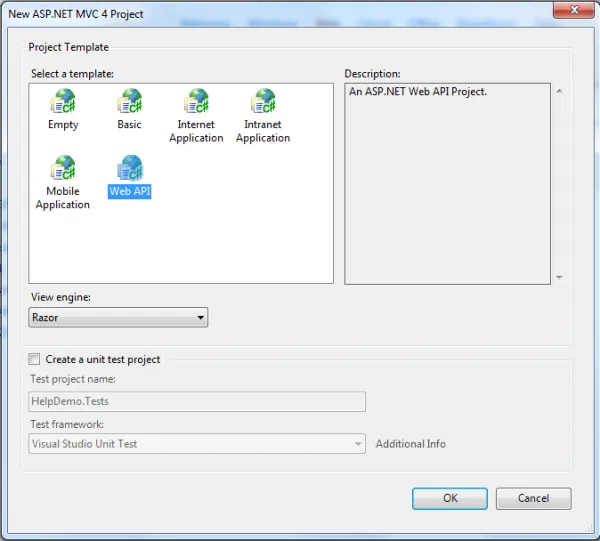
图2-27. 创建项目
This template creates a project that contains a Web API controller (ValuesController.cs) and an MVC controller (HomeController.cs).
这个模板会创建含有一个Web API控制器(ValuesController.cs)和一个MVC控制器(HomeController.cs)的项目。
Add a model class:
添加一个模型类:
namespace HelpDemo.Models
{
    public class Product
    {
        public string Name { get; set; }
        public decimal Price { get; set; }
    }
}
Add another Web API controller:
添加另一个Web API控制器:
namespace HelpDemo.Controllers
{
    using System.Collections.Generic;
    using System.Net;
    using System.Net.Http;
    using System.Web.Http;
    using HelpDemo.Models;
    public class ProductsController : ApiController
    {
        public IEnumerable Get()
        {
            return new Product[0];
        }
        public HttpResponseMessage Get(int id)
        {
            return Request.CreateResponse(HttpStatusCode.NotFound);
        }
        public void Post(Product value) { }
        public void Put(int id, Product value) { }
    }
}
This controller is not really functional, and you don't have to use this exact code. This purpose of this controller is just to give the ApiExplorer something to consume.
这个控制器并不是真正功能性的,而且你不必精确使用这些代码。这个控制器的目的只是为ApiExplorer提供一些可供使用的东西。(这里意在说明,在一个实际应用程序中,可能需要一个类似于这样的控制器,但其内容(代码)需酌情而定 — 译者注)
Next, we'll create a view model that gets data from the ApiExplorer. We could pass the ApiExplorer object directly to the MVC view. However, encapsulating the ApiExplorer in a model gives us more flexibility to manipulate the data.
下一步,我们将创建一个从ApiExplorer获取数据的视图模型,然后可以把ApiExplorer对象直接传递给MVC视图。然而,把ApiExplorer封装在一个模型中,可以让我们能够更灵活性地维护数据。
namespace HelpDemo.Models
{
    using System;
    using System.Collections.Generic;
    using System.Linq;
    using System.Web.Http.Controllers;
    using System.Web.Http.Description;
    public class ApiModel
    {
        IApiExplorer _explorer;
        public ApiModel(IApiExplorer explorer)
        {
            if (explorer == null)
            {
                throw new ArgumentNullException("explorer");
            }
            _explorer = explorer;
        }
        public ILookup GetApis()
        {
            return _explorer.ApiDescriptions.ToLookup(
                api => api.ActionDescriptor.ControllerDescriptor.ControllerName);
        }
    }
}
The GetApis method converts the collection into an ILookup, grouped by controller name. That makes it easy to group the help page by controller.
GetApis方法将集合转换成一个按控制器名称进行分组的ILookup。这样便于按控制器对帮助页面进行分组。
Open the source file for the MVC controller, HomeController.cs. Add an action to render the help page:
打开MVC控制器源文件HomeController.cs。添加一个渲染帮助页面的动作:
public ActionResult Help()
{
    var explorer = GlobalConfiguration.Configuration.Services.GetApiExplorer();
    return View(new ApiModel(explorer));
}
Add a view for the Help action:
为这个Help动作添加一个视图:
@model HelpDemo.Models.ApiModel
@{
    ViewBag.Title = "API Help";
}
@section Scripts
{
    @Scripts.Render("~/bundles/jqueryui")

}
API Help
@foreach (var group in Model.GetApis()) {@group.Key
@api.HttpMethod @api.RelativePath
Parameter: @param.Name (@param.Source)
}If you run the application and navigate to /home/help, it should look similar to the following:
如果运行这个应用程序,并导航到/home/help,页面看上去与下图类似(见图2-28):
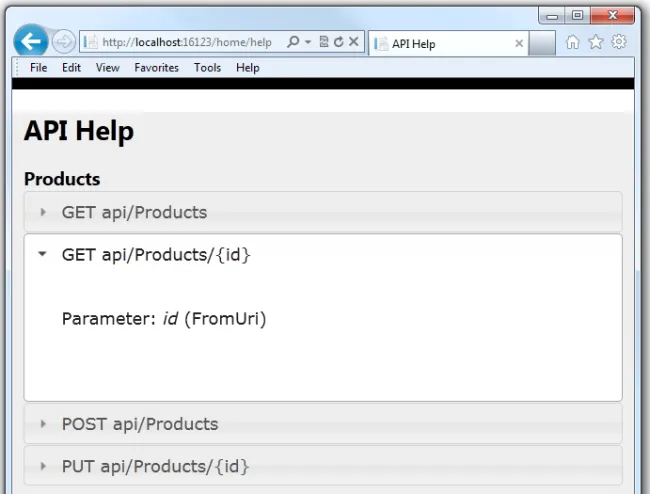
图2-28. 帮助页面外观
Adding a Documentation Provider
添加文档提供器
You can provide documentation for your APIs by implementing the IDocumentationProvider interface. Documentation strings can come from any source that you like. For this example, we will define custom attributes that can be applied to the controller. The documentation provider will grab documentation strings from the attributes.
通过实现IDocumentationProvider接口,你可以提供API的文档。文档字符串(用来作为文档内容的字符串 — 译者注)可以是你所喜欢的任何资源(这些资源当然是关于一个API的东西,比如,该API的作用或含义的描述,有哪些参数,这些参数的类型及其作用等等 — 译者注)。对于本例,我们将定义能够运用于控制器的一些自定义注解属性。文档提供器将根据这些注解属性捕获文档字符串(根据注解属性获取关于API的有关内容,并把这些内容送入文档字符串中,以便在帮助页面中显示出来 — 译者注)。
Here are the custom attributes:
以下是自定义注解属性:
[AttributeUsage(AttributeTargets.Method)]
public class ApiDocAttribute : Attribute
{
    public ApiDocAttribute(string doc)
    {
        Documentation = doc;
    }
    public string Documentation { get; set; }
}
[AttributeUsage(AttributeTargets.Method)]
public class ApiParameterDocAttribute : Attribute
{
    public ApiParameterDocAttribute(string param, string doc)
    {
        Parameter = param;
        Documentation = doc;
    }
    public string Parameter { get; set; }
    public string Documentation { get; set; }
}
Here is a controller method with the attributes:
以下是使用这些注解属性的一个控制器方法:
[ApiDoc("Gets a product by ID.")]
[ApiParameterDoc("id", "The ID of the product.")]
public HttpResponseMessage Get(int id)
{
    // ...
}
Now add a class that implements IDocumentationProvider.
现在,添加一个实现IDocumentationProvider的类:
public class DocProvider : IDocumentationProvider
{
    public string GetDocumentation(HttpParameterDescriptor parameterDescriptor)
    {
        string doc = "";
        var attr = parameterDescriptor.ActionDescriptor
                    .GetCustomAttributes()
                    .Where(p => p.Parameter == parameterDescriptor.ParameterName)
                    .FirstOrDefault();
        if (attr != null)
        {
            doc = attr.Documentation;
        }
        return doc;
    }
    public string GetDocumentation(HttpActionDescriptor actionDescriptor)
    {
        string doc = "";
        var attr = actionDescriptor.GetCustomAttributes().FirstOrDefault();
        if (attr != null)
        {
            doc = attr.Documentation;
        }
        return doc;
    }
}
Open the Global.asax.cs file and add the following code to the Application_Start method:
打开Global.asax.cs文件,并将以下代码添加到Application_Start方法:
GlobalConfiguration.Configuration.Services.Replace(
    typeof(IDocumentationProvider), new DocProvider());
ApiExplorer automatically calls into the IDocumentationProvider interface to get documentation strings for each API. It stores them in the Documentation property of the ApiDescription and ApiParameterDescription objects. The MVC view can access them as follows:
ApiExplorer会自动调用IDocumentationProvider接口,以获取每个API的文档字符串。把它们存储到ApiDescription和ApiParameterDescription对象的Documentation属性。MVC视图像下面这样访问它们:
@foreach (var api in group)
{
@api.HttpMethod @api.RelativePath
@api.Documentation
- @foreach (var param in api.ParameterDescriptions) {
- @param.Name (@param.Source): @param.Documentation
- }
Now when you render the view, it shows the documentation strings:
现在,当渲染这个视图时,便会显示出文档字符串(见图2-29):
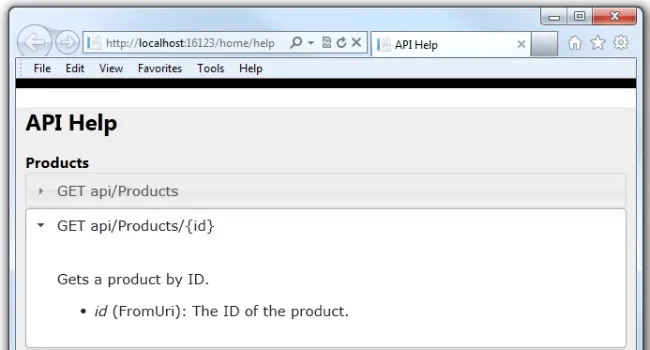
图2-29. 显示了文档字符串的帮助页面
Providing Sample Response Bodies
提供例子响应体
One thing that's missing from our help page is examples of the HTTP response body. The ApiExplorer class does not provide any direct support for this. However, it does give you the return type for each action. If the action returns a POCO, we can use this information to create an example response body, as follows:
上述帮助页面缺少的一项内容是HTTP响应体的示例。ApiExplorer类对此未提供任何直接支持。然而,它可以为你提供每个动作的返回类型。如果动作返回的是一个POCO,我们可以运用这个信息来创建一个例子响应体,步骤如下:
- 1.
- Look up an example instance of the POCO.
查找一个POCO例子实例。 - 2.
- Use a media-type formatter to serialize the example instance.
使用一个媒体类型格式化器序列化此例子实例。 - 3.
- Display the result as a string.
将结果以字符串显示出来。
To see how this can work, add the following code to the ApiModel class:
要明白如何做,添加以下代码到ApiModel类:
// Example instances
// 例子实例
static Product[] _products = new Product[]
{
    new Product() { Name = "Gizmo", Price = 1.05M },
    new Product() { Name = "Gizmo2", Price = 0.995M }
};
// Look-up table based on data type.
// 基于数据类型查询表
Dictionary _sampleData = new Dictionary() {
    { typeof(Product), _products[0] },
    { typeof(IEnumerable), _products }
};
Type GetResponseType(HttpActionDescriptor action)
{
    return action.ReturnType;
}
public string GetSampleResponseBody(ApiDescription api, string mediaType)
{
    string body = null;
    Type returnType = GetResponseType(api.ActionDescriptor);
    object o;
    if (returnType != null && _sampleData.TryGetValue(returnType, out o))
    {
        var formatters = api.SupportedResponseFormatters;
        MediaTypeFormatter formatter = formatters.FirstOrDefault(
            f => f.SupportedMediaTypes.Any(m => m.MediaType == mediaType));
        if (formatter != null)
        {
            var content = new ObjectContent(returnType, o, formatter);
            body = content.ReadAsStringAsync().Result;
        }
    }
    return body;
}
Add the following code to the MVC view:
将以下代码添加到MVC视图:
    @{
        string response = @Model.GetSampleResponseBody(api, "application/json");
    }
    @if (response != null) {
Sample response body:
@Model.GetSampleResponseBody(api, "application/json")
Here is the resulting help page:
以下是帮助页面的结果(见图2-30):
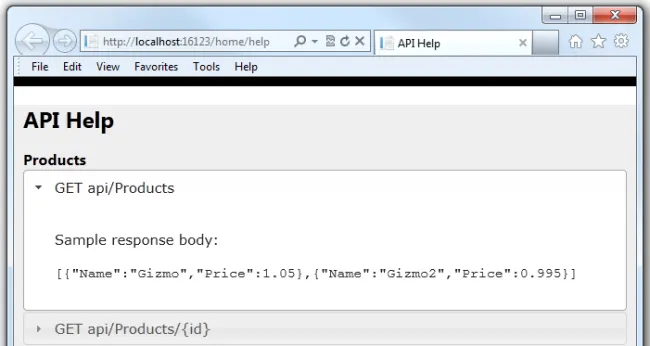
图2-30. 显示了示例的帮助页面
This approach is not perfect. If an action returns an HttpResponseMessage, there is no way to deduce the format of the message body from the static API description. The same is true for an action that returns loosely-structure JSON (see Anonymous and Weakly-Typed Objects).
这种办法不太完美。如果一个动作返回HttpResponseMessage,则没有办法根据静态API描述来推断该消息体的格式。同样,返回松散结构JSON的动作也是这样(参见Anonymous and Weakly-Typed Objects(匿名类型与弱类型对象) — 本系列教程的第6章)。
One way to work around this problem is to use the API ID to look up the response type. The API ID is a concatenation of the HTTP method and the relative URI path (for example, "GETapi/Products/{id}").
解决这一问题的一种办法是使用API ID来查找响应体类型。API ID是HTTP方法与相对URI路径的串联(例如,“GETapi/Products/{id}”)。
// Response types
// 响应类型
static Dictionary _responseTypes = new Dictionary()
    {
        { @"GETapi/Products/{id}", typeof(Product) }
    };
Type GetResponseType(ApiDescription api)
{
    Type t;
    if (_responseTypes.TryGetValue(api.ID, out t))
    {
        return t;
    }
    return api.ActionDescriptor.ReturnType;
}
Custom attributes are another option.
自定义注解属性是(针对这一问题的)另一种选择。
Excluding an API
排除一个API
To hide an API from the ApiExplorer, add the ApiExplorerSettings attribute to the action and set IgnoreApi to true.
为了从ApiExplorer中隐藏一个API,将ApiExplorerSettings注解属性添加到该动作,并将IgnoreApi设置为true:
[ApiExplorerSettings(IgnoreApi=true)]
public HttpResponseMessage Get(int id)
{
}
You can also add this attribute to the controller, to exclude the entire controller.
你也可以把这个注解属性添加到控制器,以排除整个控制器(的所有API)。
看完此文如果觉得有所收获,恳请给个推荐


