
一、前言
2026年,OpenClaw(Clawdbot)已成为轻量化AI智能体的主流框架,其核心竞争力在于多Agent协同、精准消息路由、全平台稳定运行。很多用户在落地过程中普遍遇到三大痛点:服务部署环境混乱、多Agent身份错乱、飞书群消息路由失效、模型API配置不生效。本文严格遵循官方规范,完整覆盖阿里云轻量服务器极速部署、本地MacOS/Linux/Windows11一键安装、阿里云千问与免费Coding Plan模型配置、多Agent创建与飞书群精准路由、新手避坑与常见问题解答,所有命令可直接复制运行,帮助用户在1–2小时内搭建一套稳定、有序、可扩展的多智能体协作系统。
二、核心认知:多Agent路由的价值与规范
多Agent路由是OpenClaw实现“专人专事”的核心机制,通过标准化bindings规则,将不同渠道、不同群组的消息精准分发到对应智能体,彻底解决身份混淆、消息乱飘、回复错乱等问题。阿里云部署 OpenClaw 只需两步,全网最简单,步骤流程 访问阿里云OpenClaw一键部署专题页面 了解。
路由三大铁律
- 必须使用
peer.kind + peer.id标准格式,严禁自定义chatId等非标准字段; - 一个群只绑定一个Agent,避免规则重叠与冲突;
- 配置后必须用
openclaw doctor校验,再重启网关,防止服务瘫痪。
三、2026阿里云轻量服务器部署OpenClaw(零基础最简)
步骤1:创建实例(官方镜像一键启动)
- 登录阿里云控制台,进入轻量应用服务器;
- 镜像选择:应用镜像 → OpenClaw(Clawdbot)2026稳定版;
- 推荐配置:2核4GB、40GB ESSD、5Mbps带宽;
- 地域:中国香港、新加坡、美国弗吉尼亚(内地地域联网能力受限);
- 设置root密码,购买并等待实例运行。
零基础部署 OpenClaw 喂饭级步骤流程
第一步:点击打开访问阿里云OpenClaw一键部署专题页面。


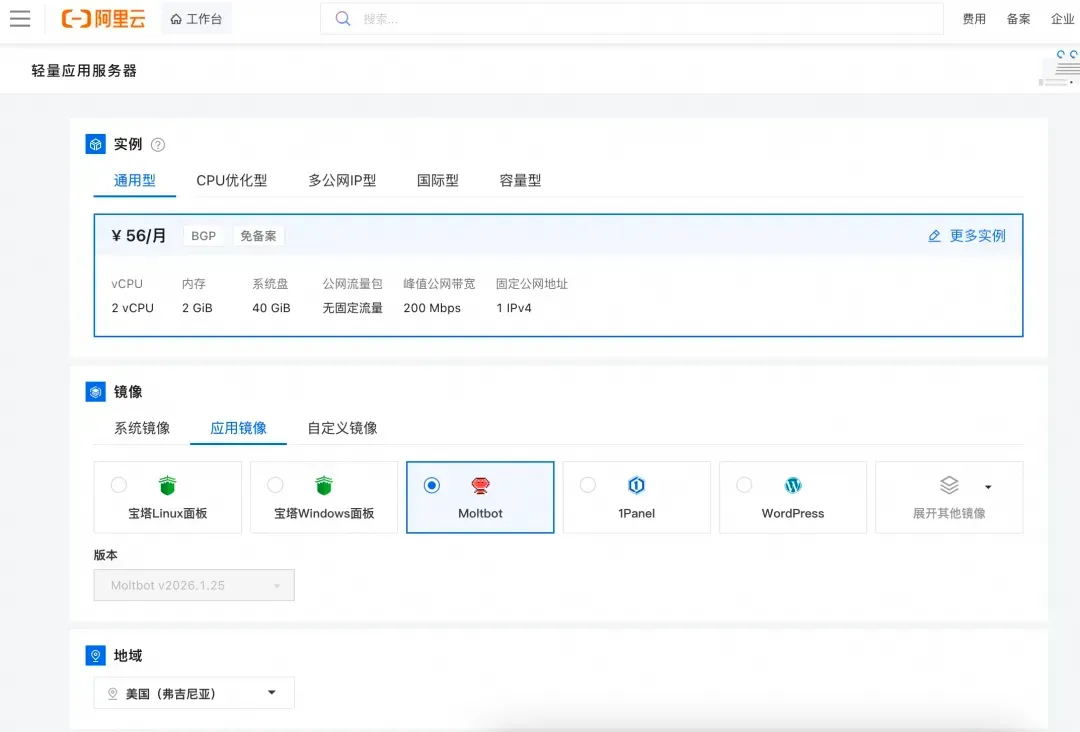
第二步:打开选择阿里云轻量应用服务器,配置参考如下:
- 镜像:OpenClaw(Moltbot)镜像(已经购买服务器的用户可以重置系统重新选择镜像)
- 实例:内存必须2GiB及以上。
- 地域:默认美国(弗吉尼亚),目前中国内地域(除香港)的轻量应用服务器,联网搜索功能受限。
- 时长:根据自己的需求及预算选择。

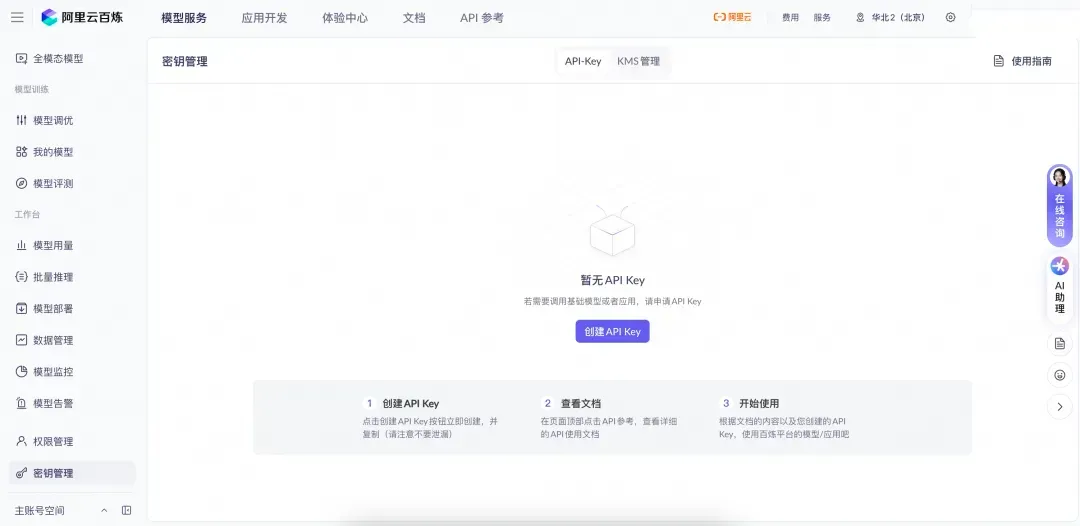
第三步:打开访问阿里云百炼大模型控制台,找到密钥管理,单击创建API-Key。
前往轻量应用服务器控制台,找到安装好OpenClaw的实例,进入「应用详情」放行18789端口、配置百炼API-Key、执行命令,生成访问OpenClaw的Token。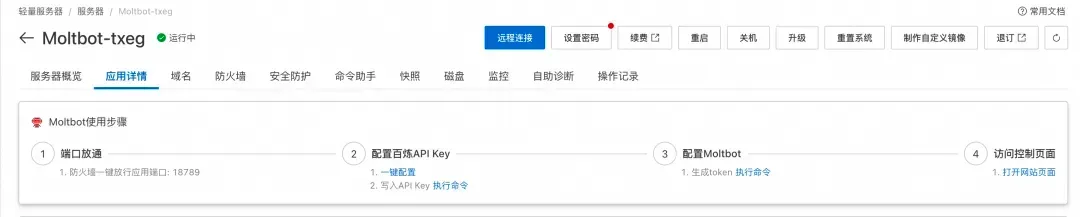
- 端口放通:需要放通对应端口的防火墙,单击一键放通即可。
- 配置百炼API-Key,单击一键配置,输入百炼的API-Key。单击执行命令,写入API-Key。
- 配置OpenClaw:单击执行命令,生成访问OpenClaw的Token。
- 访问控制页面:单击打开网站页面可进入OpenClaw对话页面。
阿里云百炼Coding Plan API-Key 获取、配置保姆级教程:
创建API-Key,推荐访问订阅阿里云百炼Coding Plan,阿里云百炼Coding Plan每天两场抢购活动,从按tokens计费升级为按次收费,可以进一步节省费用!
- 购买后,在控制台生成API Key。注:这里复制并保存好你的API Key,后面要用。

- 回到轻量应用服务器-控制台,单击服务器卡片中的实例 ID,进入服务器概览页。

- 在服务器概览页面单击应用详情页签,进入服务器详情页面。

- 端口放通在OpenClaw使用步骤区域中,单击端口放通下的执行命令,可开放获取OpenClaw 服务运行端口的防火墙。

- 这里系统会列出我们第一步中创建的阿里云百炼 Coding Plan的API Key,直接选择就可以。

- 获取访问地址单击访问 Web UI 面板下的执行命令,获取 OpenClaw WebUI 的地址。


步骤2:一键放行端口(必做)
进入实例详情 → 防火墙 → 一键放通:
- 18789(Web控制台)
- 8080(飞书Webhook)
命令备用:firewall-cmd --permanent --add-port=18789/tcp firewall-cmd --permanent --add-port=8080/tcp firewall-cmd --reload
步骤3:初始化与启动服务
cd /opt/openclaw
npm config set registry https://registry.npmmirror.com
openclaw init --non-interactive --accept-risk
openclaw gateway install
openclaw gateway start
openclaw gateway status
步骤4:访问控制台
http://你的公网IP:18789
四、本地全平台部署OpenClaw(MacOS/Linux/Windows11)
(一)MacOS部署
xcode-select --install
/bin/bash -c "$(curl -fsSL https://raw.githubusercontent.com/Homebrew/install/HEAD/install.sh)"
brew install node@22
echo 'export PATH="/opt/homebrew/opt/node@22/bin:$PATH"' >> ~/.zshrc
source ~/.zshrc
curl -fsSL https://openclaw.ai/install.sh | bash
openclaw onboard --install-daemon
openclaw gateway start
(二)Linux(Ubuntu/Debian)部署
sudo apt update && sudo apt upgrade -y
sudo apt install -y curl git
curl -fsSL https://deb.nodesource.com/setup_22.x | sudo bash
sudo apt install -y nodejs
npm config set registry https://registry.npmmirror.com
npm install -g openclaw@latest
openclaw onboard --install-daemon
sudo ufw allow 18789/tcp
sudo ufw allow 8080/tcp
openclaw gateway start
(三)Windows11部署(WSL2)
管理员PowerShell:
wsl --install
wsl --set-default-version 2
Ubuntu终端:
sudo apt update
sudo apt install -y curl git nodejs npm
npm config set registry https://registry.npmmirror.com
npm install -g openclaw@latest
openclaw onboard --install-daemon
openclaw gateway start
五、大模型API配置(千问Qwen3-Max + 免费Coding Plan)
(一)阿里云千问大模型配置
cd ~/.openclaw
nano openclaw.json
写入:
"models": {

  "default": "bailian/qwen3-max-2026-01-23",
  "providers": {

    "bailian": {

      "baseUrl": "https://dashscope.aliyuncs.com/compatible-mode/v1",
      "apiKey": "sk-你的千问APIKey",
      "models": [
        {
   "id":"qwen3-max-2026-01-23","maxTokens":65536},
        {
   "id":"qwen3.5-plus","maxTokens":16384}
      ]
    }
  }
}
重启:
openclaw gateway restart
(二)免费Coding Plan配置
"models": {

  "default": "coding-plan/coding-free",
  "providers": {

    "coding-plan": {

      "baseUrl": "https://coding.dashscope.aliyuncs.com/v1",
      "apiKey": "sk-sp-你的免费APIKey",
      "models": [{
   "id":"coding-free","maxTokens":4096}]
    }
  }
}
六、多Agent创建(办公助理+技术支持+数据分析师)
# 办公助理
openclaw agent create \
--id "office-assistant" \
--name "办公助理" \
--workspace "~/.openclaw/workspaces/office" \
--identity '{"name":"小办","description":"日程、邮件、文档"}'

# 技术支持
openclaw agent create \
--id "tech-support" \
--name "技术支持" \
--workspace "~/.openclaw/workspaces/tech" \
--identity '{"name":"小技","description":"故障排查、操作指导"}'

# 数据分析师
openclaw agent create \
--id "data-analyst" \
--name "数据分析师" \
--workspace "~/.openclaw/workspaces/data" \
--identity '{"name":"小析","description":"统计、报告、可视化"}'

# 查看列表
openclaw agents list
七、飞书开放平台配置与群ID获取
- 新建企业自建应用,开启机器人能力;
- 开通权限:
im:message:send、im:message:read、im:chat:read; - 事件订阅:
http://IP:8080/feishu/webhook; - 获取群ID(以
oc_开头):npm install -g feishu-cli feishu-cli login --app-id "你的AppID" --app-secret "你的AppSecret" feishu-cli chat list
八、飞书多Agent精准路由配置(核心)
编辑~/.openclaw/openclaw.json:
{

  "agents": {

    "list": [
      {

        "id": "office-assistant",
        "name": "办公助理",
        "workspace": "~/.openclaw/workspaces/office",
        "identity": {
   "name":"小办","description":"日程、邮件、文档"}
      },
      {

        "id": "tech-support",
        "name": "技术支持",
        "workspace": "~/.openclaw/workspaces/tech",
        "identity": {
   "name":"小技","description":"故障排查、操作指导"}
      },
      {

        "id": "data-analyst",
        "name": "数据分析师",
        "workspace": "~/.openclaw/workspaces/data",
        "identity": {
   "name":"小析","description":"统计、报告、可视化"}
      }
    ]
  },
  "channels": {

    "feishu": {

      "enabled": true,
      "appId": "你的飞书AppID",
      "appSecret": "你的飞书AppSecret",
      "webhookPath": "/feishu/webhook",
      "port": 8080
    }
  },
  "bindings": [
    {

      "type": "route",
      "agentId": "office-assistant",
      "match": {

        "channel": "feishu",
        "peer": {
   "kind": "group", "id": "oc_办公群ID"}
      }
    },
    {

      "type": "route",
      "agentId": "tech-support",
      "match": {

        "channel": "feishu",
        "peer": {
   "kind": "group", "id": "oc_技术群ID"}
      }
    },
    {

      "type": "route",
      "agentId": "data-analyst",
      "match": {

        "channel": "feishu",
        "peer": {
   "kind": "group", "id": "oc_数据群ID"}
      }
    },
    {

      "type": "route",
      "agentId": "office-assistant",
      "match": {
   "channel": "*"}
    }
  ]
}
九、校验与启动
openclaw doctor
openclaw agents list --bindings
openclaw gateway restart
十、OpenClaw常用运维命令
openclaw gateway start
openclaw gateway stop
openclaw gateway restart
openclaw gateway status
openclaw logs -f
openclaw model test
openclaw token generate --admin
openclaw doctor
十一、阿里云+本地部署避坑指南(新手必看)
地域选错导致模型/飞书异常
必须选中国香港、新加坡、弗吉尼亚,内地地域受限。端口未放行无法访问
18789、8080必须双重放行。路由报错:Invalid config
删除chatId,严格使用peer.kind+peer.id。飞书消息不路由
检查群ID以oc_开头,检查权限,重启网关。模型调用失败
千问:sk-开头;Coding Plan:sk-sp-开头,不可混用。服务启动即崩溃
内存≥2GB,推荐4GB,关闭占用程序。
十二、常见问题解答(FAQ)
一台服务器可以跑多少个Agent?
2核4GB可稳定跑3–5个Agent。能否一个机器人对应多个Agent?
不推荐,建议一个机器人对应一个Agent。**本地部署可以绑定飞书吗?
可以,需公网IP或内网穿透,指向8080端口。如何修改Agent人设?
openclaw agent update ID --identity {...}消息被全局路由截胡怎么办?
提高精准群路由优先级,全局路由放在最后。Coding Plan免费额度不够用怎么办?
切换为千问 youtiku,或调整请求频率。
十三、总结
OpenClaw多Agent路由的核心是标准化、强校验、不猜字段。本文完整提供阿里云轻量服务器部署、本地三平台安装、千问/Coding Plan双模型配置、多智能体创建、飞书群精准绑定的全流程方案,所有命令与配置均可直接复制使用。遵循peer.kind+peer.id路由规则,配合openclaw doctor前置校验,可彻底告别身份错乱、消息乱飘、服务崩溃等问题,快速搭建一套企业级稳定AI协作系统。

