本文已收录在Github,关注我,紧跟本系列专栏文章,咱们下篇再续!
- 🚀 魔都架构师 | 全网30W技术追随者
- 🔧 大厂分布式系统/数据中台实战专家
- 🏆 主导交易系统百万级流量调优 & 车联网平台架构
- 🧠 AIGC应用开发先行者 | 区块链落地实践者
- 🌍 以技术驱动创新,我们的征途是改变世界!
- 👉 实战干货:编程严选网
0 前言
本文基于 sentinel1.5.2。
graph LR
    NodeSelectorSlot --> ClusterBuilderSlot
    ClusterBuilderSlot --> LogSlot
    LogSlot --> StatisticSlot
    StatisticSlot --> AuthoritySlot
    AuthoritySlot --> SystemSlot
    SystemSlot --> FlowSlot
    FlowSlot --> DegradeSlot
1 NodeSelectorSlot
链中处理的第一个节点。
@Spi(isSingleton = false, order = Constants.ORDER_NODE_SELECTOR_SLOT)
public class NodeSelectorSlot extends AbstractLinkedProcessorSlot<Object> {
    /**
     * 相同资源的DefaultNode在不同的上下文
     * <context name, DefaultNode实例> 用上下文名称而非资源名称作为map的键
     */
    private volatile Map<String, DefaultNode> map = new HashMap<String, DefaultNode>(10);
    @Override
    public void entry(Context context, ResourceWrapper resourceWrapper, Object obj, int count, boolean prioritized, Object... args)
        throws Throwable {
        /*
         * 无论哪种上下文中,相同资源(ResourceWrapper#equals)全局共享相同的(ProcessorSlotChain)。
         * 因此,如果代码进入entry方法,则资源名称须相同,但上下文名称可能不同
         *
         * 若用{SphU#entry(String resource)}在不同上下文中进入相同资源,则用上下文名称作为map键可区分相同资源
         * 此时,将为每个不同上下文(不同的上下文名称)创建多个具有相同资源名称的{DefaultNode}
         *
         * 再想,Q:一个资源可能有多个{DefaultNode},获取同一资源的统计信息的最好方法是?
         * A:所有具有相同资源名称的{DefaultNode}共享一个{ClusterNode},详见{ClusterBuilderSlot}
         */
        DefaultNode node = map.get(context.getName());
        if (node == null) {
            synchronized (this) {
                node = map.get(context.getName());
                if (node == null) {
                    node = new DefaultNode(resourceWrapper, null);
                    HashMap<String, DefaultNode> cacheMap = new HashMap<String, DefaultNode>(map.size());
                    cacheMap.putAll(map);
                    cacheMap.put(context.getName(), node);
                    map = cacheMap;
                    // Build invocation tree
                    ((DefaultNode) context.getLastNode()).addChild(node);
                }
            }
        }
        context.setCurNode(node);
        fireEntry(context, resourceWrapper, node, count, prioritized, args);
    }
}
责任链实例和 resource name 相关,和线程无关,所以处理同一resource 时,会进入同一 NodeSelectorSlot 实例。
1.1 职责
不同context name,同一resource name的场景。
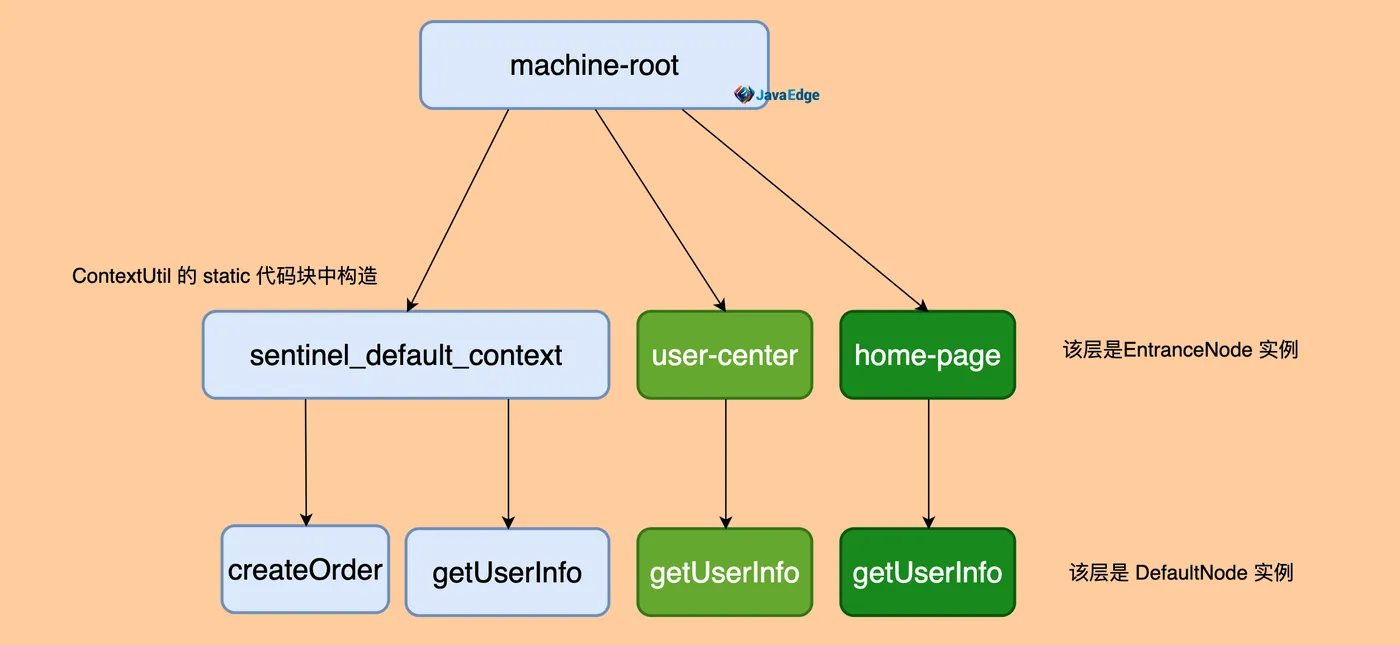
如下都处理同一 resource("getUserInfo" resource),但入口 context 不一:
private void getUserInfoFromUserCenter() {
    ContextUtil.enter("user-center");
    try (Entry entry = SphU.entry("getUserInfo")) {
        // ...
    } catch (BlockException e) {
        throw new RuntimeException("系统忙");
    }
}
private void getUserInfoFromHomePage() {
    ContextUtil.enter("home-page");
    try (Entry entry = SphU.entry("getUserInfo")) {
        // ...
    } catch (BlockException e) {
        throw new RuntimeException("系统忙");
    }
}
结合前面那棵树,可得此树:
1.2 小结
NodeSelectorSlot 实例和 resource 一一对应!
2 ClusterBuilderSlot
主要创建ClusterNode:
/**
 * 此slot维护资源运行统计信息(响应时间, qps, 线程计数, 异常)
 * 以及由ContextUtil#enter(String origin)标记的调用者列表。
 * 一个资源只有一个cluster节点, 而一个资源可以有多个default节点
 */
@Spi(isSingleton = false, order = Constants.ORDER_CLUSTER_BUILDER_SLOT)
public class ClusterBuilderSlot extends AbstractLinkedProcessorSlot<DefaultNode> {
    /**
     * 任何上下文中, 相同的资源都将全局共享相同的ProcessorSlotChain。
     * 因此, 若代码走进entry方法,资源名称须相同,但上下文名称可能不同。
     *
     * 为获得在不同上下文中相同资源的总统计信息, 相同资源在全局范围内共享同一ClusterNode。所有ClusterNode都缓存在此map。
     */
    private static volatile Map<ResourceWrapper, ClusterNode> clusterNodeMap = new HashMap<>();

    private static final Object lock = new Object();

    private volatile ClusterNode clusterNode = null;
    @Override
    public void entry(Context context, ResourceWrapper resourceWrapper, DefaultNode node, int count, boolean prioritized, Object... args) {
        if (clusterNode == null) {
           // 应用程序运行时间越长,此map越稳定
            // 所以不用并发map而是锁。因为锁仅在初始时发生,而并发map将始终持有该锁
            synchronized (lock) {
                if (clusterNode == null) {
                    // 创建集群节点
                    clusterNode = new ClusterNode(resourceWrapper.getName(), resourceWrapper.getResourceType());

                    HashMap<ResourceWrapper, ClusterNode> newMap = new HashMap<>(Math.max(clusterNodeMap.size(), 16));
                    newMap.putAll(clusterNodeMap);
                    newMap.put(node.getId(), clusterNode);

                    clusterNodeMap = newMap;
                }
            }
        }

        node.setClusterNode(clusterNode);
    }
}
该类处理后:
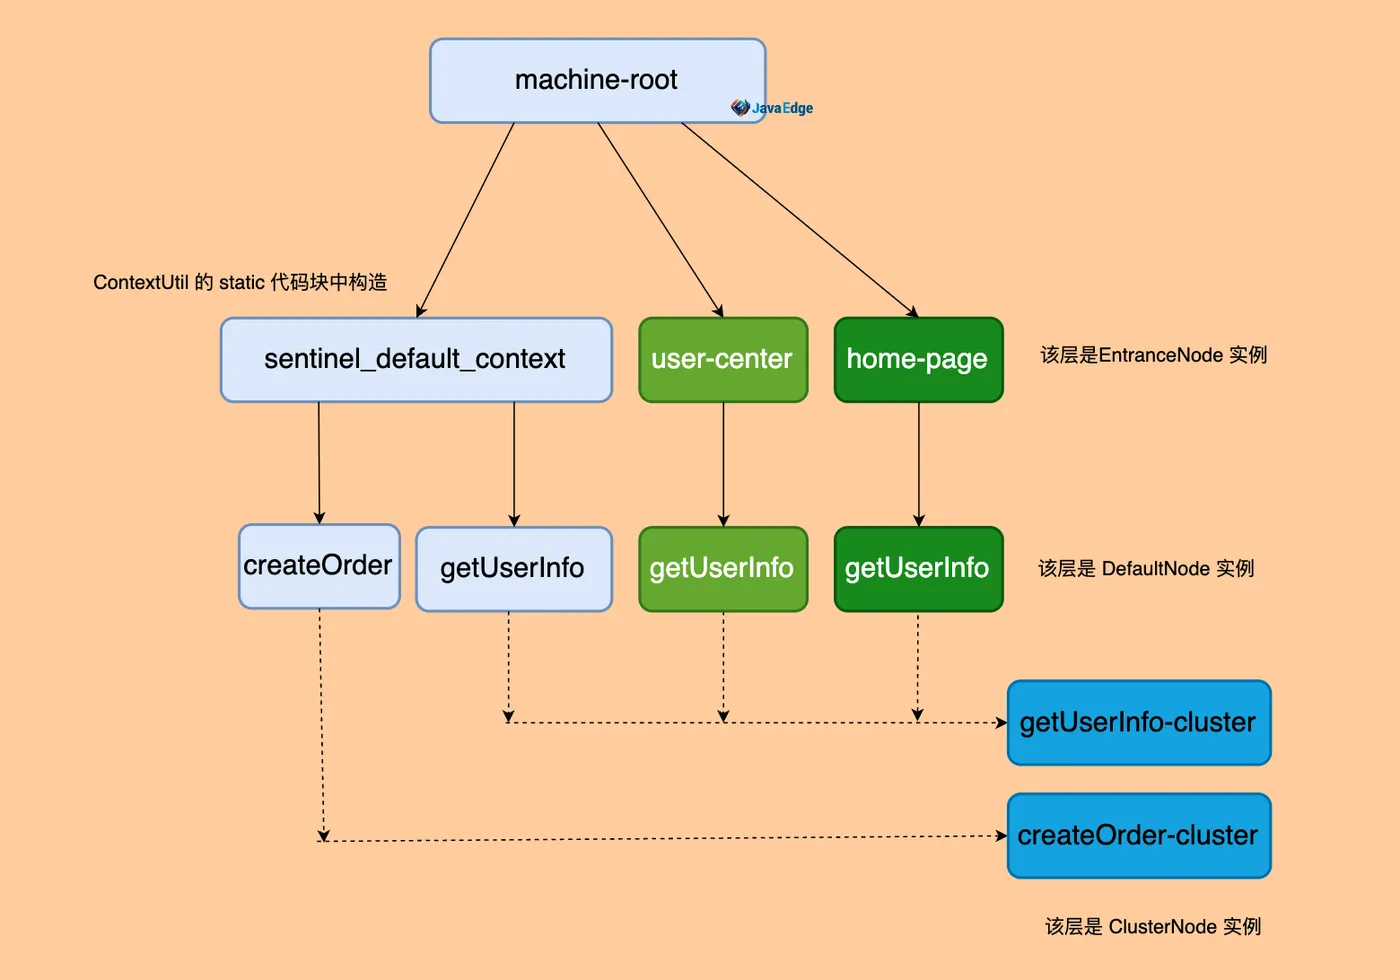
小结
每个 resource 对应一个 ClusterNode 实例,若不存在,就创建一个新实例。
统计意义
数据统计。如 getUserInfo 接口,由于从不同 context name 开启调用链,它有多个 DefaultNode 实例,但只有一个 ClusterNode,通过该实例,即可知道该接口QPS。
此类还处理了 origin 不是默认值场景: origin代表调用方标识,如application-a、application-b:
/*
 * 若设置context origin,则应获取或创建一个特定 origin 的新 Node
 */
if (!"".equals(context.getOrigin())) {
    Node originNode = node.getClusterNode().getOrCreateOriginNode(context.getOrigin());
    context.getCurEntry().setOriginNode(originNode);
}
当设置了origin,会生成一个 StatisticsNode 实例,挂在 ClusterNode。改下案例代码:
private void getUserInfoFromUserCenter() {
    ContextUtil.enter("user-center", "application-a");
    try (Entry entry = SphU.entry("getUserInfo")) {
        // ...
    } catch (BlockException e) {
        throw new RuntimeException("系统忙");
    }
}
private void getUserInfoFromHomePage() {
    ContextUtil.enter("home-page", "application-b");
    try (Entry entry = SphU.entry("getUserInfo")) {
        // ...
    } catch (BlockException e) {
        throw new RuntimeException("系统忙");
    }
}
getUserInfo接收到来自application-a、application-b两个应用的请求:
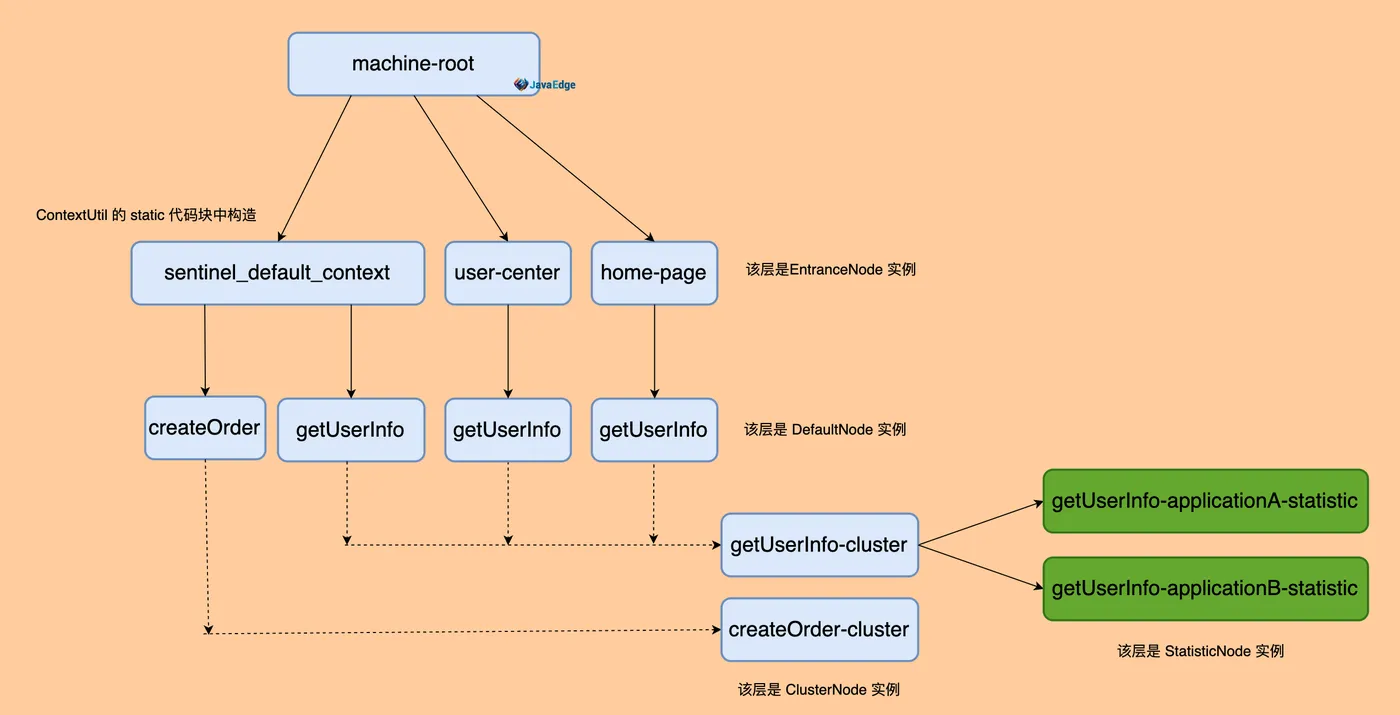
作用
统计从 application-a 过来的访问 getUserInfo 这个接口的信息。该信息在 dashboard 不展示,毕竟没啥用。
3 LogSlot
直接 fire 出去了,即先处理责任链后面的节点,若它们抛 BlockException,才处理。
// 这是对日志块异常的响应,为故障排除提供具体日志,
@Spi(order = Constants.ORDER_LOG_SLOT)
public class LogSlot extends AbstractLinkedProcessorSlot<DefaultNode> {
    @Override
    public void entry(Context context, ResourceWrapper resourceWrapper, DefaultNode obj, int count, boolean prioritized, Object... args)
        throws Throwable {
        try {
            fireEntry(context, resourceWrapper, obj, count, prioritized, args);
        } catch (BlockException e) {
           // 将被设置的规则 block 的信息记录到日志文件 sentinel-block,log,即记录哪些接口被规则挡住
            EagleEyeLogUtil.log(resourceWrapper.getName(), e.getClass().getSimpleName(), e.getRuleLimitApp(),
                context.getOrigin(), e.getRule().getId(), count);
            throw e;
        } catch (Throwable e) {
            RecordLog.warn("Unexpected entry exception", e);
        }
    }
4 StatisticSlot
4.1 作用
数据统计。
4.2 原理
先fire,等后面节点处理完毕后,再统计数据。
Q:为何这样设计?
A:因为后面节点是做控制,执行时可能正常通过,也可能抛 BlockException。
注意:
- QPS统计用滑动窗口算法
- 线程并发的统计,用LongAdder
接下来几个 Slot 需:
- 通过 dashboard 开启,因为需配置规则
- 也可硬编码规则到代码。但要调整数值就麻烦,每次都要改代码重新发布
5 AuthoritySlot
5.1 作用
权限控制,根据 origin 做黑白名单的控制:
在 dashboard 中,是这么配置的:
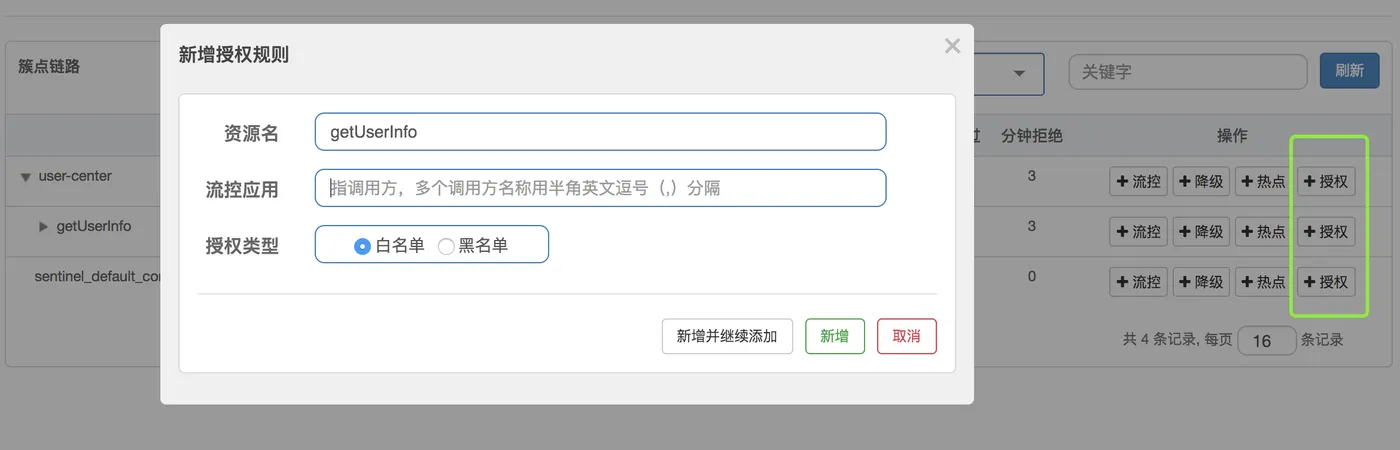
这里的调用方就是 origin。
6 SystemSlot
6.1 作用
实现自适应限流。
// 一个专用于 systemRule 检查的 Processorslot
@Spi(order = Constants.ORDER_SYSTEM_SLOT)
public class SystemSlot extends AbstractLinkedProcessorSlot<DefaultNode> {
    @Override
    public void entry(Context context, ResourceWrapper resourceWrapper, DefaultNode node, int count,
                      boolean prioritized, Object... args) throws Throwable {
        SystemRuleManager.checkSystem(resourceWrapper, count);
        fireEntry(context, resourceWrapper, node, count, prioritized, args);
    }
    @Override
    public void exit(Context context, ResourceWrapper resourceWrapper, int count, Object... args) {
        fireExit(context, resourceWrapper, count, args);
    }
}
规则校验都在SystemRuleManager#checkSystem:
public static void checkSystem(ResourceWrapper resourceWrapper, int count) throws BlockException {
    if (resourceWrapper == null) {
        return;
    }
    // Ensure the checking switch is on.
    if (!checkSystemStatus.get()) {
        return;
    }
    // for inbound traffic only
    if (resourceWrapper.getEntryType() != EntryType.IN) {
        return;
    }
    // total qps
    double currentQps = Constants.ENTRY_NODE.passQps();
    if (currentQps + count > qps) {
        throw new SystemBlockException(resourceWrapper.getName(), "qps");
    }
    // total thread
    int currentThread = Constants.ENTRY_NODE.curThreadNum();
    if (currentThread > maxThread) {
        throw new SystemBlockException(resourceWrapper.getName(), "thread");
    }
    double rt = Constants.ENTRY_NODE.avgRt();
    if (rt > maxRt) {
        throw new SystemBlockException(resourceWrapper.getName(), "rt");
    }
先说说上面的代码中的 RT、线程数、入口 QPS 这三项系统保护规则。
dashboard配置界面:
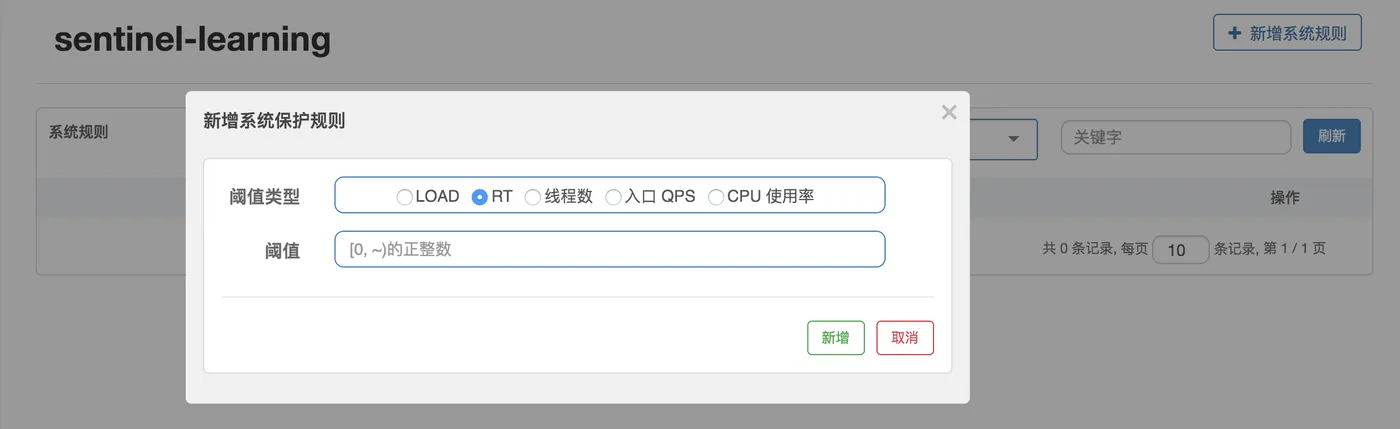
StatisticSlot 类有下面一段:
if (resourceWrapper.getEntryType() == EntryType.IN) {
    // Add count for global inbound entry node for global statistics.
   // 为全局统计信息添加全局入站entry节点的计数
    Constants.ENTRY_NODE.increaseThreadNum();
    Constants.ENTRY_NODE.addPassRequest(count);
}
Sentinel针对所有入口流量,用一个全局的 ENTRY_NODE 统计,系统保护规则是全局的,和具体某资源无关。
由于系统的平均 RT、当前线程数、QPS 都可从 ENTRY_NODE 获得,所以限制代码非常简单,比较大小即可。超过阈值抛SystemBlockException。
ENTRY_NODE 是 ClusterNode 类型,而 ClusterNode 对 rt、qps 都是统计秒维度。
6.2 系统负载和 CPU 资源
Sentinel通过调用 MBean 中的方法获取当前的系统负载和 CPU 使用率,Sentinel 起了一个后台线程,每秒查询一次。
OperatingSystemMXBean osBean =
ManagementFactory.getPlatformMXBean(OperatingSystemMXBean.class);
currentLoad = osBean.getSystemLoadAverage();
currentCpuUsage = osBean.getSystemCpuLoad();
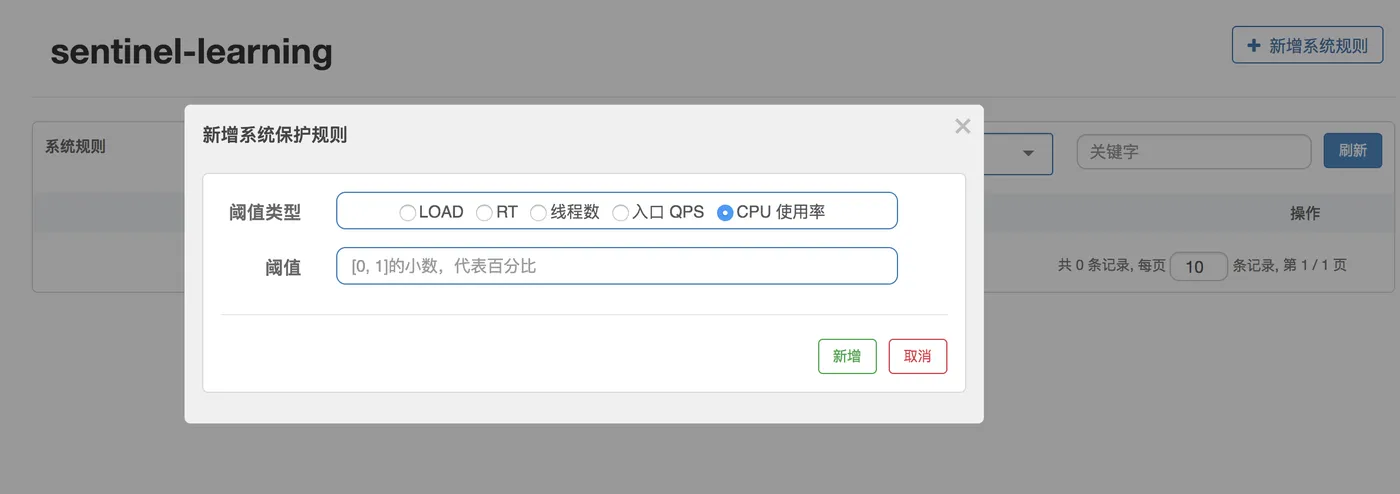
dashboard 中对 CPU 使用率的规则配置:
7 FlowSlot
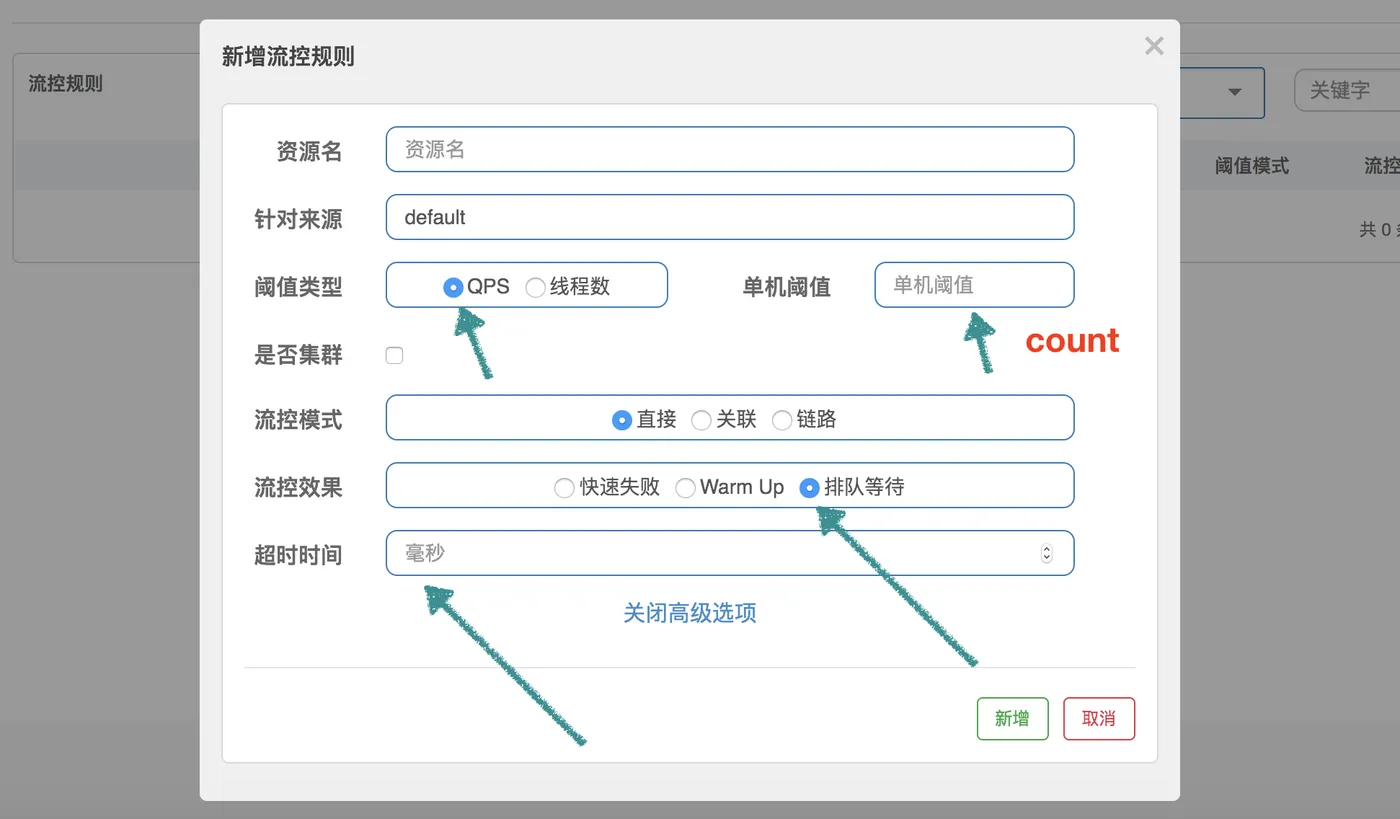
Sentinel本身定位流控工具,FlowSlot天生重要,涉及限流算法。
案例
设QPS=10,即每100ms允许通过一个,通过计算当前时间是否已过了上一个请求的通过时间 latestPassedTime 之后的100ms,来判断是否可通过。若才过50ms,则需当前线程再sleep 50ms,然后才可通过。若同时有另一请求?就需sleep 150ms。
8 DegradeSlot
三种策略,先看
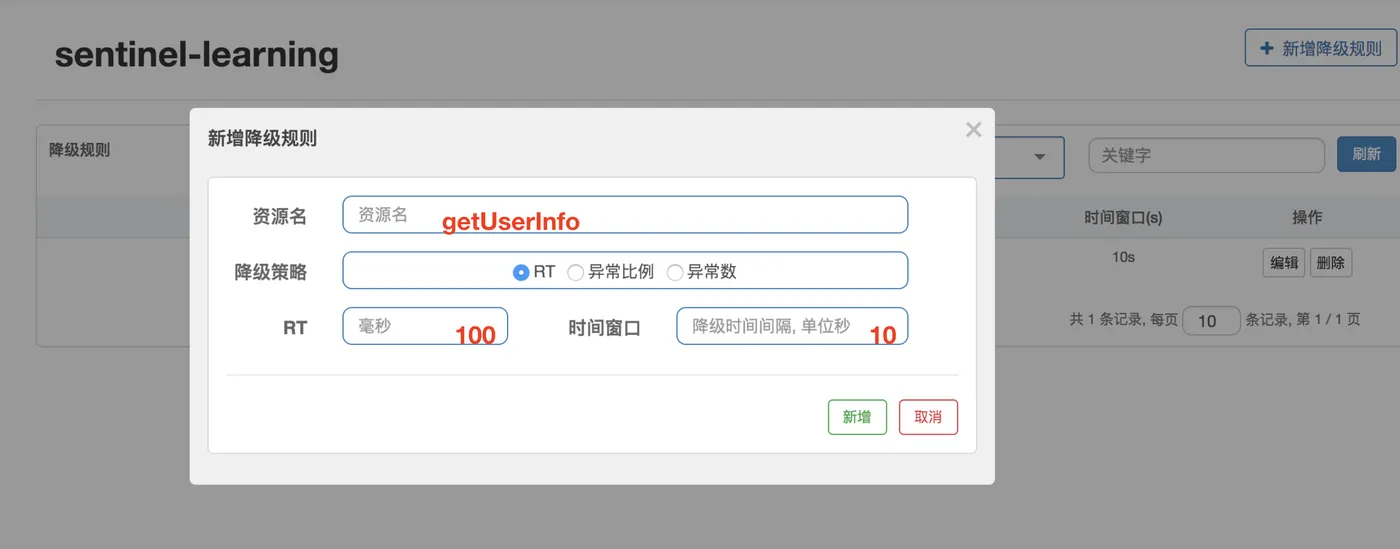
8.1 根据RT降级
8.2 原理
若按上图配置:对 getUserInfo 资源,正常只需50ms,若其RT超过100ms,则进入半降级状态,接下来的5次访问,若都超过100ms,则接下来的10s内,所有请求都会被拒绝。
8.3 DegradeRule#passCheck
Sentinel用cut作开关,开启后,会启动一个定时任务,过了 10s 后关闭:
if (cut.compareAndSet(false, true)) {
    ResetTask resetTask = new ResetTask(this);
    pool.schedule(resetTask, timeWindow, TimeUnit.SECONDS);
}
达到阈值,开启断路器,之后由定时任务关闭。
★后续优化:Refactor degrade hierarchy with new circuit breaker mechanism and improve strategy
”
- Add
CircuitBreakerabstraction (with half-open state) and add circuit breaker state change event observer support.- Improve circuit breaking strategy (avg RT → slow request ratio) and make statistics of each rule dependent (to support arbitrary statistic interval).
- Add simple "trial" mechanism (aka. half-open).
- Refactor mechanism of metric recording and state change handling for circuit breakers: record RT and error when requests have completed (i.e.
onExit, based on #1420).
9 和dashboard交互
sentinel-transport子工程的common是基础包和接口定义:
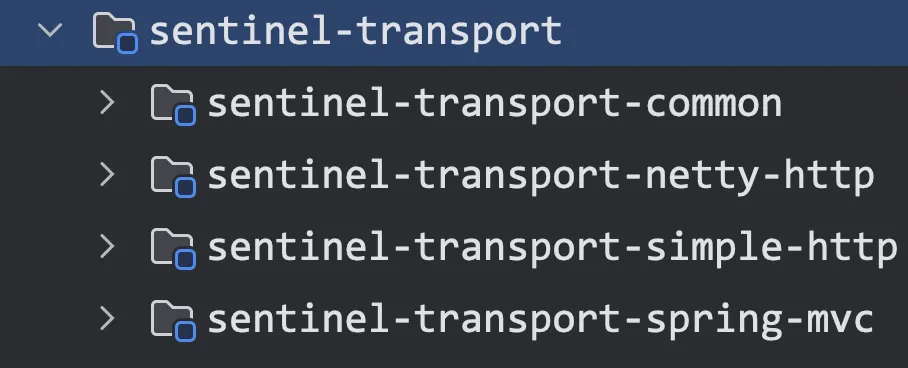
若客户端要接入dashboard,可用 netty-http/simple-http/spring-mvc 中的一个。
Q:为啥不直接用Netty,而同时提供http选项?
A:你不一定用 Java 实现 dashboard。若用其他语言,用 http 协议较容易适配。
9.1 http使用
先添加 simple-http 依赖:
<dependency>
    <groupId>com.alibaba.csp</groupId>
    <artifactId>sentinel-transport-simple-http</artifactId>
    <version>1.8.6</version>
</dependency>
应用启动参数添加 dashboard 服务器地址,同时指定当前应用名称:
-Dcsp.sentinel.dashboard.server=127.0.0.1:8080
 -Dproject.name=sentinel-learning
这时打开 dashboard 看不到该应用的,因为还没注册。第一次用 Sentinel 后,Sentinel 会自动注册。
用到 Sentinel 时,先调用 SphU#entry:
public class SphU {
    private static final Object[] OBJECTS0 = new Object[0];
    private SphU() {}
    /**
     * 记录统计信息并执行给定资源的规则校验
     */
    public static Entry entry(String name) throws BlockException {
        return Env.sph.entry(name, EntryType.OUT, 1, OBJECTS0);
    }
用到Env类:
/**
 * Sentinel 环境,此类将触发Sentinel的所有初始化
 * 注意:为避免死锁,其他类的静态代码块或静态字段永远不要引用此类
 */
public class Env {
    public static final Sph sph = new CtSph();
    static {
        // If init fails, the process will exit.
        InitExecutor.doInit();
    }
}
进到 InitExecutor.doInit 方法:
public static void doInit() {
    if (!initialized.compareAndSet(false, true)) {
        return;
    }
    try {
        List<InitFunc> initFuncs = SpiLoader.of(InitFunc.class).loadInstanceListSorted();
        List<OrderWrapper> initList = new ArrayList<OrderWrapper>();
        for (InitFunc initFunc : initFuncs) {
            insertSorted(initList, initFunc);
        }
        for (OrderWrapper w : initList) {
            w.func.init();
        }
用 SPI 加载 InitFunc 的实现,加载了:
- CommandCenterInitFunc 类:客户端启动的接口服务,提供给 dashboard 查询数据和规则设置使用
- HeartbeatSenderInitFunc 类:用于客户端主动发送心跳信息给 dashboard
9.2 HeartbeatSenderInitFunc#init
@Override
public void init() {
   // 使用 SPI 机制加载 HeartbeatSender 的实现类
   // 如果添加了 sentinel-transport-simple-http 依赖,那么 SimpleHttpHeartbeatSender 就会被加载
    HeartbeatSender sender = HeartbeatSenderProvider.getHeartbeatSender();
    if (sender == null) {
        RecordLog.warn("[HeartbeatSenderInitFunc] WARN: No HeartbeatSender loaded");
        return;
    }
    initSchedulerIfNeeded();
    long interval = retrieveInterval(sender);
    setIntervalIfNotExists(interval);
   // 启动一个定时器,发送心跳信息
    scheduleHeartbeatTask(sender, interval);
}
private void scheduleHeartbeatTask(/*@NonNull*/ final HeartbeatSender sender, /*@Valid*/ long interval) {
    pool.scheduleAtFixedRate(new Runnable() {
        @Override
        public void run() {
            try {
                sender.sendHeartbeat();
            } catch (Throwable e) {
                RecordLog.warn("[HeartbeatSender] Send heartbeat error", e);
            }
        }
    }, 5000, interval, TimeUnit.MILLISECONDS);
    RecordLog.info("[HeartbeatSenderInit] HeartbeatSender started: "
        + sender.getClass().getCanonicalName());
}
定时器,以一定的间隔不断发送心跳信息到 dashboard 应用
@Spi(order = Spi.ORDER_LOWEST - 100)
public class HttpHeartbeatSender implements HeartbeatSender {

  @Override
  public boolean sendHeartbeat() throws Exception {
      if (StringUtil.isEmpty(consoleHost)) {
          return false;
      }
      URIBuilder uriBuilder = new URIBuilder();
      uriBuilder.setScheme(consoleProtocol.getProtocol()).setHost(consoleHost).setPort(consolePort)
          .setPath(TransportConfig.getHeartbeatApiPath())
          .setParameter("app", AppNameUtil.getAppName())
          .setParameter("app_type", String.valueOf(SentinelConfig.getAppType()))
          .setParameter("v", Constants.SENTINEL_VERSION)
          .setParameter("version", String.valueOf(System.currentTimeMillis()))
          .setParameter("hostname", HostNameUtil.getHostName())
          .setParameter("ip", TransportConfig.getHeartbeatClientIp())
          .setParameter("port", TransportConfig.getPort())
          .setParameter("pid", String.valueOf(PidUtil.getPid()));
      HttpGet request = new HttpGet(uriBuilder.build());
      request.setConfig(requestConfig);
      // Send heartbeat request.
      CloseableHttpResponse response = client.execute(request);
      response.close();
      int statusCode = response.getStatusLine().getStatusCode();
      if (statusCode == OK_STATUS) {
          return true;
      } else if (clientErrorCode(statusCode) || serverErrorCode(statusCode)) {
          RecordLog.warn("[HttpHeartbeatSender] Failed to send heartbeat to "
              + consoleHost + ":" + consolePort + ", http status code: " + statusCode);
      }
      return false;
  }
dashboard 有了这些信息,就可以对应用进行规则设置、到应用拉取数据用于页面展示等。
Sentinel 在客户端并未使用第三方 http 包,而是自己基于 JDK 的 Socket 和 ServerSocket 接口实现了简单的客户端和服务端,主要也是为了不增加依赖。
10 Sentinel秒级QPS统计问题
Sentinel 统计 分、秒 两维数据: 1、对于 分 来说,一轮是 60 秒,分为 60 个时间窗口,每个时间窗口是 1 秒 2、对于 秒 来说,一轮是 1 秒,分为 2 个时间窗口,每个时间窗口是 0.5 秒 如果我们用上面介绍的统计分维度的 BucketLeapArray 来统计秒维度数据可以吗?不行,因为会不准确。
设想一个场景,我们的一个资源,访问的 QPS 稳定是 10,假设请求是均匀分布的,在相对时间 0.0 - 1.0 秒区间,通过了 10 个请求,我们在 1.1 秒的时候,观察到的 QPS 可能只有 5,因为此时第一个时间窗口被重置了,只有第二个时间窗口有值。
所以,我们可以知道,如果用 BucketLeapArray 来实现,会有 0~50% 的数据误差,这肯定是不能接受的。 那能不能增加窗口的数量来降低误差到一个合理的范围内呢?这个大家可以思考一下,考虑一下它对于性能是否有较大的损失。
StatisticNode 源码,对于秒维度数据统计,Sentinel 使用下面的构造方法:
// 2 个时间窗口,每个窗口长度 0.5秒
public ArrayMetric(int sampleCount, int intervalInMs) {
    this.data = new OccupiableBucketLeapArray(sampleCount, intervalInMs);
}
OccupiableBucketLeapArray 的 newEmptyBucket 和 resetWindowTo 这两个方法和 BucketLeapArray 有点不一样,也就是在重置的时候,它不是直接重置成 0。
该类的 borrowArray 做了一些事,它是 FutureBucketLeapArray 的实例,该类类似BucketLeapArray,多个Future,唯一区别是重写了如下方法:
@Override
public boolean isWindowDeprecated(long time, WindowWrap<MetricBucket> windowWrap) {
    // Tricky: will only calculate for future.
    return time >= windowWrap.windowStart();
}
按此定义,调用values()时,所有的 2 个窗口都是过期的,得不到任何值。可以判断,给这数组添加值时,使用时间应该不是当前时间,而是一个未来时间点。
回到 OccupiableBucketLeapArray 类,重置使用了 borrowArray 的值:当主线到达某时间窗口,如发现当前时间窗口过期,会重置这窗口
@Override
protected WindowWrap<MetricBucket> resetWindowTo(WindowWrap<MetricBucket> w, long time) {
    // Update the start time and reset value.
    w.resetTo(time);
    MetricBucket borrowBucket = borrowArray.getWindowValue(time);
   // 检查 borrowArray 是否有值
    if (borrowBucket != null) {
        w.value().reset();
       // 如果有,将其作为这个窗口的初始值填充进来,而不是简单重置为0
        w.value().addPass((int)borrowBucket.pass());
    } else {
        w.value().reset();
    }
    return w;
}
再看 borrowArray 中的值是怎么进来的。只可能通过addWaiting设置:
@Override
public void addWaiting(long time, int acquireCount) {
    WindowWrap<MetricBucket> window = borrowArray.currentWindow(time);
    window.value().add(MetricEvent.PASS, acquireCount);
}
那就找这方法被谁调用,发现仅DefaultController类,流控中的 “快速失败” 规则控制器:
@Override
public boolean canPass(Node node, int acquireCount, boolean prioritized) {
    int curCount = avgUsedTokens(node);
    if (curCount + acquireCount > count) {
        // 只有设置了 prioritized 才会进入到下面的 if 分支,
        // 即对于一般场景,被限流就快速失败
        if (prioritized && grade == RuleConstant.FLOW_GRADE_QPS) {
            long currentTime;
            long waitInMs;
            currentTime = TimeUtil.currentTimeMillis();
            // 占有"未来的"令牌
            waitInMs = node.tryOccupyNext(currentTime, acquireCount, count);
            if (waitInMs < OccupyTimeoutProperty.getOccupyTimeout()) {
                // 设置了 borrowArray 值
                node.addWaitingRequest(currentTime + waitInMs, acquireCount);
                node.addOccupiedPass(acquireCount);
                // sleep避免 QPS 因预占而撑大
                sleep(waitInMs);
                // PriorityWaitException 代表请求将在等待waitInMs后通过
                throw new PriorityWaitException(waitInMs);
            }
        }
        return false;
    }
    return true;
}
OccupiableBucketLeapArray
Occupiable代表可被预占,结合 DefaultController 源码,可知它原来是用来满足 prioritized 类型的资源的,可认为这类请求有较高优先级。若 QPS 达到阈值,这类资源通常不能用快速失败返回, 而是让它去预占未来的 QPS 容量。 但这里根本没解答 QPS 咋准确计算的。
证明Sentinel秒维度QPS统计不准确
public static void main(String[] args) {
    // 下面几行代码设置了 QPS 阈值是 100
    FlowRule rule = new FlowRule("test");
    rule.setGrade(RuleConstant.FLOW_GRADE_QPS);
    rule.setCount(100);
    rule.setControlBehavior(RuleConstant.CONTROL_BEHAVIOR_DEFAULT);
    List<FlowRule> list = new ArrayList<>();
    list.add(rule);
    FlowRuleManager.loadRules(list);
    // 先通过一个请求,让 clusterNode 先建立起来
    try (Entry entry = SphU.entry("test")) {
    } catch (BlockException e) {
    }
    // 起一个线程一直打印 qps 数据
    new Thread(new Runnable() {
        @Override
        public void run() {
            while (true) {
                System.out.println(ClusterBuilderSlot.getClusterNode("test").passQps());
            }
        }
    }).start();
    while (true) {
        try (Entry entry = SphU.entry("test")) {
            Thread.sleep(5);
        } catch (BlockException e) {
            // ignore
        } catch (InterruptedException e) {
            // ignore
        }
    }
}
然后观察下输出,QPS 数据在 50~100 这个区间一直变化,印证秒级 QPS 统计极度不准确。