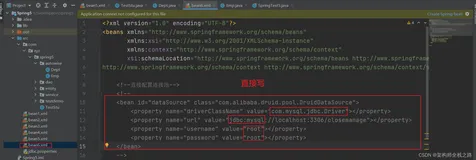
xml配置与类配置
1.xml配置
<?xml version="1.0" encoding="UTF-8"?>
<beans xmlns="http://www.springframework.org/schema/beans"
xmlns:xsi="http://www.w3.org/2001/XMLSchema-instance"
xsi:schemaLocation="http://www.springframework.org/schema/beans http://www.springframework.org/schema/beans/sp
 <bean id="person" class="com.binghe.spring.Person"></bean>
</beans>
获取Person实例如下所示。
public static void main( String[] args ){
 ClassPathXmlApplicationContext ctx = new ClassPathXmlApplicationContext("beans.xml");
 System.out.println(ctx.getBean("person"));
}
2.类配置
@Configuration
public class MainConfig {
    @Bean
    public Person person(){
     return new Person();
    }
}
这里,有一个需要注意的地方:通过@Bean的形式是使用的话, bean的默认名称是方法名,若@Bean(value="bean的名称")那么bean的名称是指定的 。
获取Person实例如下所示。
public static void main( String[] args ){
 AnnotationConfigApplicationContext ctx = new AnnotationConfigApplicationContext(MainConfig.class);
 System.out.println(ctx.getBean("person"));
}
@CompentScan注解
我们可以使用@CompentScan注解来进行包扫描,如下所示。
@Configuration
@ComponentScan(basePackages = {"com.binghe.spring"})
 public class MainConfig {
}
excludeFilters 属性
当我们使用@CompentScan注解进行扫描时,可以使用@CompentScan注解的excludeFilters 属性来排除某些类,如下所示。
@Configuration
@ComponentScan(basePackages = {"com.binghe.spring"},excludeFilters = {
@ComponentScan.Filter(type = FilterType.ANNOTATION,value = {Controller.class}),
@ComponentScan.Filter(type = FilterType.ASSIGNABLE_TYPE,value = {PersonService.class})
})
public class MainConfig {
}
includeFilters属性
当我们使用@CompentScan注解进行扫描时,可以使用@CompentScan注解的includeFilters属性将某些类包含进来。这里需要注意的是:需要把useDefaultFilters属性设置为false(true表示扫描全部的)
@Configuration
@ComponentScan(basePackages = {"com.binghe.spring"},includeFilters = {
@ComponentScan.Filter(type = FilterType.ANNOTATION,value = {Controller.class, PersonService.class})
},useDefaultFilters = false)
public class MainConfig {
}
@ComponentScan.Filter type的类型
- 注解形式的FilterType.ANNOTATION @Controller @Service @Repository @Compent
- 指定类型的 FilterType.ASSIGNABLE_TYPE @ComponentScan.Filter(type =FilterType.ASSIGNABLE_TYPE,value = {Person.class})
- aspectj类型的 FilterType.ASPECTJ(不常用)
- 正则表达式的 FilterType.REGEX(不常用)
- 自定义的 FilterType.CUSTOM
public enum FilterType {
    //注解形式 比如@Controller @Service @Repository @Compent
    ANNOTATION,
    //指定的类型
    ASSIGNABLE_TYPE,
    //aspectJ形式的
    ASPECTJ,
    //正则表达式的
    REGEX,
    //自定义的
    CUSTOM
}
FilterType.CUSTOM 自定义类型
public class CustomFilterType implements TypeFilter {
@Override
public boolean match(MetadataReader metadataReader, MetadataReaderFactory metadataReaderFactory) throws IOException {
    //获取当前类的注解源信息
    AnnotationMetadata annotationMetadata = metadataReader.getAnnotationMetadata();
    //获取当前类的class的源信息
    ClassMetadata classMetadata = metadataReader.getClassMetadata();
    //获取当前类的资源信息
    Resource resource = metadataReader.getResource();
  return classMetadata.getClassName().contains("Service");
}
@ComponentScan(basePackages = {"com.binghe.spring"},includeFilters = {
@ComponentScan.Filter(type = FilterType.CUSTOM,value = CustomFilterType.class)
},useDefaultFilters = false)
public class MainConfig {
}
配置Bean的作用域对象
不指定@Scope
在不指定@Scope的情况下,所有的bean都是单实例的bean,而且是饿汉加载(容器启动实例就创建好了)
@Bean
public Person person() {
 return new Person();
}
@Scope为 prototype
指定@Scope为 prototype 表示为多实例的,而且还是懒汉模式加载(IOC容器启动的时候,并不会创建对象,而是在第一次使用的时候才会创建)
@Bean
@Scope(value = "prototype")
public Person person() {
    return new Person();
}
@Scope取值
- singleton 单实例的(默认)
- prototype 多实例的
- request 同一次请求
- session 同一个会话级别
懒加载
Bean的懒加载@Lazy(主要针对单实例的bean 容器启动的时候,不创建对象,在第一次使用的时候才会创建该对象)
@Bean
@Lazy
public Person person() {
 return new Person();
}
@Conditional条件判断
场景,有二个组件CustomAspect 和CustomLog ,我的CustomLog组件是依赖于CustomAspect的组件 应用:自己创建一个CustomCondition的类 实现Condition接口
public class CustomCondition implements Condition {
/****
@param context
* @param metadata
* @return
*/
    @Override
    public boolean matches(ConditionContext context, AnnotatedTypeMetadata metadata) {
        //判断容器中是否有CustomAspect的组件
        return context.getBeanFactory().containsBean("customAspect");
    }
}
public class MainConfig {
    @Bean
    public CustomAspect customAspect() {
        return new CustomAspect();
    }
    @Bean
    @Conditional(value = CustomCondition.class)
    public CustomLog customLog() {
     return new CustomLog();
    }
}
向IOC 容器添加组件
(1)通过@CompentScan +@Controller @Service @Respository @compent。适用场景: 针对我们自己写的组件可以通过该方式来进行加载到容器中。
(2)通过@Bean的方式来导入组件(适用于导入第三方组件的类)
(3)通过@Import来导入组件 (导入组件的id为全类名路径)
@Configuration
@Import(value = {Person.class})
public class MainConfig {
}
通过@Import 的ImportSeletor类实现组件的导入 (导入组件的id为全类名路径)
public class CustomImportSelector implements ImportSelector {
    @Override
    public String[] selectImports(AnnotationMetadata importingClassMetadata) {
     return new String[]{"com.binghe.spring"};
    }
}
Configuration
@Import(value = {Person.class}
public class MainConfig {
}
通过@Import的 ImportBeanDefinitionRegister导入组件 (可以指定bean的名称)
public class DogBeanDefinitionRegister implements ImportBeanDefinitionRegistrar {
    @Override
    public void registerBeanDefinitions(AnnotationMetadata importingClassMetadata, BeanDefinitionRegistry registry) {
        //创建一个bean定义对象
        RootBeanDefinition rootBeanDefinition = new RootBeanDefinition(Dog.class);
        //把bean定义对象导入到容器中
        registry.registerBeanDefinition("dog",rootBeanDefinition);
    }
}
@Configuration
@Import(value = {Person.class, Car.class, CustomImportSelector.class, DogBeanDefinitionRegister.class})
public class MainConfig {
}
通过实现FacotryBean接口来实现注册 组件
public class CarFactoryBean implements FactoryBean<Car> {
    @Override
    public Car getObject() throws Exception {
     return new Car();
    }
    @Override
    public Class<?> getObjectType() {
     return Car.class;
    }
    @Override
    public boolean isSingleton() {
     return true;
    }
}
Bean的初始化与销毁
指定bean的初始化方法和bean的销毁方法
由容器管理Bean的生命周期,我们可以通过自己指定bean的初始化方法和bean的销毁方法
@Configuration
public class MainConfig {
    //指定了bean的生命周期的初始化方法和销毁方法.@Bean(initMethod = "init",destroyMethod = "destroy")
    public Car car() {
     return new Car();
    }
}
针对单实例bean的话,容器启动的时候,bean的对象就创建了,而且容器销毁的时候,也会调用Bean的销毁方法
针对多实例bean的话,容器启动的时候,bean是不会被创建的而是在获取bean的时候被创建,而且bean的销毁不受IOC容器的管理
通过 InitializingBean和DisposableBean实现
通过 InitializingBean和DisposableBean个接口实现bean的初始化以及销毁方法
@Component
public class Person implements InitializingBean,DisposableBean {
    public Person() {
     System.out.println("Person的构造方法");
    }
    @Override
    public void destroy() throws Exception {
     System.out.println("DisposableBean的destroy()方法 ");
    }
    @Override
    public void afterPropertiesSet() throws Exception {
     System.out.println("InitializingBean的 afterPropertiesSet方法");
    }
}
通过JSR250规范
通过JSR250规范 提供的注解@PostConstruct 和@ProDestory标注的方法
@Component
public class Book {
    public Book() {
     System.out.println("book 的构造方法");
    }
    @PostConstruct
    public void init() {
     System.out.println("book 的PostConstruct标志的方法");
    }
    @PreDestroy
    public void destory() {
     System.out.println("book 的PreDestory标注的方法");
    }
}
通过BeanPostProcessor实现
通过Spring的BeanPostProcessor的 bean的后置处理器会拦截所有bean创建过程
- postProcessBeforeInitialization 在init方法之前调用
- postProcessAfterInitialization 在init方法之后调用
@Component
public class CustomBeanPostProcessor implements BeanPostProcessor {
    @Override
    public Object postProcessBeforeInitialization(Object bean, String beanName) throws BeansException {
     System.out.println("CustomBeanPostProcessor...postProcessBeforeInitialization:"+beanName);
     return bean;
    }
    @Override
    public Object postProcessAfterInitialization(Object bean, String beanName) throws BeansException {
        System.out.println("CustomBeanPostProcessor...postProcessAfterInitialization:"+beanName);
        return bean;
    }
}
BeanPostProcessor的执行时机
populateBean(beanName, mbd, instanceWrapper)
initializeBean{
    applyBeanPostProcessorsBeforeInitialization()
    invokeInitMethods{
    isInitializingBean.afterPropertiesSet()
    自定义的init方法
}
applyBeanPostProcessorsAfterInitialization()方法
}
通过@Value +@PropertySource来给组件赋值
public class Person {
    //通过普通的方式
    @Value("独孤")
    private String firstName;
    //spel方式来赋值
    @Value("#{28-8}")
    private Integer age;
    通过读取外部配置文件的值
    @Value("${person.lastName}")
    private String lastName;
}
@Configuration
@PropertySource(value = {"classpath:person.properties"}) //指定外部文件的位置
public class MainConfig {
    @Bean
    public Person person() {
        return new Person();
    }
}
自动装配
@AutoWired的使用
自动注入
@Repository
public class CustomDao {
}
@Service
public class CustomService {
    @Autowired
    private CustomDao customDao;
}
结论: (1)自动装配首先时按照类型进行装配,若在IOC容器中发现了多个相同类型的组件,那么就按照 属性名称来进行装配
@Autowired
private CustomDao customDao;
比如,我容器中有二个CustomDao类型的组件 一个叫CustomDao 一个叫CustomDao2那么我们通过@AutoWired 来修饰的属性名称时CustomDao,那么拿就加载容器的CustomDao组件,若属性名称为tulignDao2 那么他就加载的时CustomDao2组件
(2)假设我们需要指定特定的组件来进行装配,我们可以通过使用@Qualifier("CustomDao")来指定装配的组件 或者在配置类上的@Bean加上@Primary注解
@Autowired
@Qualifier("CustomDao")
private CustomDao customDao2
(3)假设我们容器中即没有CustomDao 和CustomDao2,那么在装配的时候就会抛出异常
No qualifying bean of type 'com.binghhe.spring.dao.CustomDao' available
若我们想不抛异常 ,我们需要指定 required为false的时候可以了
@Autowired(required = false)
@Qualifier("customDao")
private CustomDao CustomDao2;
(4)@Resource(JSR250规范) 功能和@AutoWired的功能差不多一样,但是不支持@Primary 和@Qualifier的支持
(5)@InJect(JSR330规范) 需要导入jar包依赖,功能和支持@Primary功能 ,但是没有Require=false的功能
<dependency>
    <groupId>javax.inject</groupId>
    <artifactId>javax.inject</artifactId>
    <version>1</version>
</dependency>
(6)使用@Autowired 可以标注在方法上
- 标注在set方法上
//@Autowired
public void setCustomLog(CustomLog customLog) {
 this.customLog = customLog;
}
- 标注在构造方法上
@Autowired
public CustomAspect(CustomLog customLog) {
 this.customLog = customLog;
}
标注在配置类上的入参中(可以不写)
@Bean
public CustomAspect CustomAspect(@Autowired CustomLog customLog) {
    CustomAspect customAspect = new CustomAspect(customLog);
    return ustomAspect;
}
XXXAwarce接口
我们自己的组件 需要使用spring ioc的底层组件的时候,比如 ApplicationContext等我们可以通过实现XXXAware接口来实现
@Component
public class CustomCompent implements ApplicationContextAware,BeanNameAware {
    private ApplicationContext applicationContext;
    @Override
    public void setBeanName(String name) {
     System.out.println("current bean name is :【"+name+"】");
    }
    @Override
    public void setApplicationContext(ApplicationContext applicationContext) throws BeansException {
     this.applicationContext = applicationContext;
    }
}
@Profile注解
通过@Profile注解 来根据环境来激活标识不同的Bean
- @Profile标识在类上,那么只有当前环境匹配,整个配置类才会生效
- @Profile标识在Bean上 ,那么只有当前环境的Bean才会被激活
- 没有标志为@Profile的bean 不管在什么环境都可以被激活
@Configuration
@PropertySource(value = {"classpath:ds.properties"})
public class MainConfig implements EmbeddedValueResolverAware {
    @Value("${ds.username}")
    private String userName;
    @Value("${ds.password}")
    private String password;
    private String jdbcUrl;
    private String classDriver;
    @Override
    public void setEmbeddedValueResolver(StringValueResolver resolver) {
        this.jdbcUrl = resolver.resolveStringValue("${ds.jdbcUrl}");
        this.classDriver = resolver.resolveStringValue("${ds.classDriver}");
    }
    @Bean
    @Profile(value = "test")
    public DataSource testDs() {
     return buliderDataSource(new DruidDataSource());
    }
    @Bean
    @Profile(value = "dev")
    public DataSource devDs() {
     return buliderDataSource(new DruidDataSource());
    }
    @Bean
    @Profile(value = "prod")
    public DataSource prodDs() {
     return buliderDataSource(new DruidDataSource());
    }
    private DataSource buliderDataSource(DruidDataSource dataSource) {
        dataSource.setUsername(userName);
        dataSource.setPassword(password);
        dataSource.setDriverClassName(classDriver);
        dataSource.setUrl(jdbcUrl);
     return dataSource;
    }
}
激活切换环境的方法
(1)运行时jvm参数来切换
-Dspring.profiles.active=test|dev|prod
(2)通过代码的方式来激活
public static void main(String[] args) {
    AnnotationConfigApplicationContext ctx = new AnnotationConfigApplicationContext();
    ctx.getEnvironment().setActiveProfiles("test","dev");
    ctx.register(MainConfig.class);
    ctx.refresh();
    printBeanName(ctx);
}