
How to resolve unassigned shards in Elasticsearch
In Elasticsearch, a healthy cluster is a balanced cluster: primary and replica shards are distributed across all nodes for durable reliability in case of node failure.
But what should you do when you see shards lingering in an UNASSIGNEDstate?
Before we dive into some solutions, let’s verify that the unassigned shards contain data that we need to preserve (if not, deleting these shards is the most straightforward way to resolve the issue). If you already know the data’s worth saving, jump to the solutions:
- Shard allocation is purposefully delayed
- Too many shards, not enough nodes
- You need to re-enable shard allocation
- Shard data no longer exists in the cluster
- Low disk watermark
- Multiple Elasticsearch versions
The commands in this post are formatted under the assumption that you are running each Elasticsearch instance’s HTTP service on the default port (9200). They are also directed to localhost, which assumes that you are submitting the request locally; otherwise, replace localhost with your node’s IP address.
Pinpointing problematic shards
Elasticsearch’s cat API will tell you which shards are unassigned, and why:
curl -XGET localhost:9200/_cat/shards?h=index,shard,prirep,state,unassigned.reason| grep UNASSIGNED
Each row lists the name of the index, the shard number, whether it is a primary (p) or replica ® shard, and the reason it is unassigned:
constant-updates 0 p UNASSIGNED NODE_LEFT node_left[NODE_NAME]
If the unassigned shards belong to an index you thought you deleted already, or an outdated index that you don’t need anymore, then you can delete the index to restore your cluster status to green:
curl -XDELETE 'localhost:9200/index_name/'
If that didn’t solve the issue, read on to try other solutions.
Reason 1: Shard allocation is purposefully delayed
When a node leaves the cluster, the master node temporarily delays shard reallocation to avoid needlessly wasting resources on rebalancing shards, in the event the original node is able to recover within a certain period of time (one minute, by default). If this is the case, your logs should look something like this:
[TIMESTAMP][INFO][cluster.routing] [MASTER NODE NAME] delaying allocation for [54] unassigned shards, next check in [1m]
You can dynamically modify the delay period like so:
curl -XPUT 'localhost:9200/<INDEX_NAME>/_settings' -d '
{
    "settings": {
      "index.unassigned.node_left.delayed_timeout": "30s"
    }
}'
Replacing <INDEX_NAME> with _all will update the threshold for all indices in your cluster.
After the delay period is over, you should start seeing the master assigning those shards. If not, keep reading to explore solutions to other potential causes.
Reason 2: Too many shards, not enough nodes
As nodes join and leave the cluster, the master node reassigns shards automatically, ensuring that multiple copies of a shard aren’t assigned to the same node. In other words, the master node will not assign a primary shard to the same node as its replica, nor will it assign two replicas of the same shard to the same node. A shard may linger in an unassigned state if there are not enough nodes to distribute the shards accordingly.
To avoid this issue, make sure that every index in your cluster is initialized with fewer replicas per primary shard than the number of nodes in your cluster by following the formula below:
N >= R + 1
Where N is the number of nodes in your cluster, and R is the largest shard replication factor across all indices in your cluster.
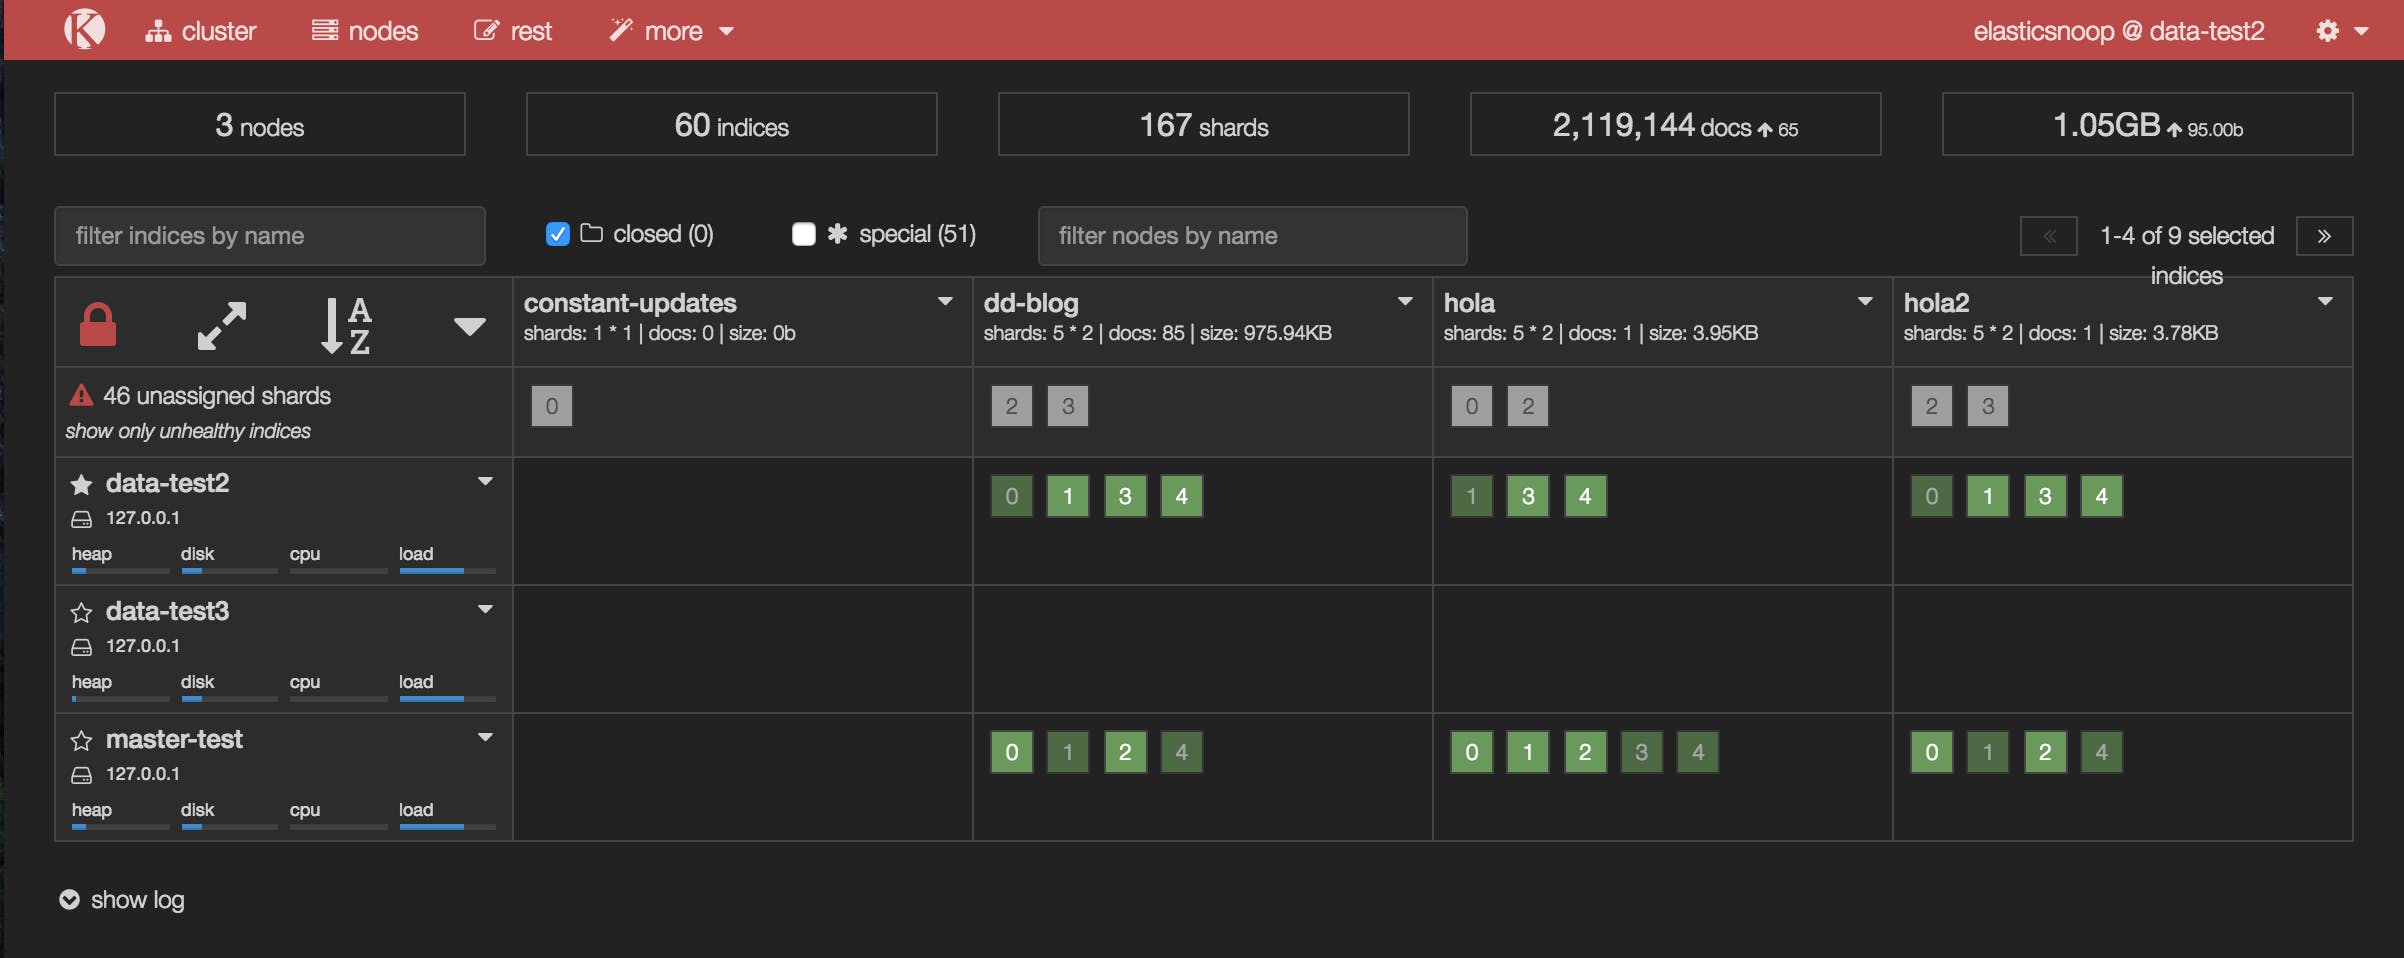
In the screenshot below, the many-shards index is stored on four primary shards and each primary has four replicas. Eight of the index’s 20 shards are unassigned because our cluster only contains three nodes. Two replicas of each primary shard haven’t been assigned because each of the three nodes already contains a copy of that shard.
To resolve this issue, you can either add more data nodes to the cluster or reduce the number of replicas. In our example, we either need to add at least two more nodes in the cluster or reduce the replication factor to two, like so:
curl -XPUT 'localhost:9200/<INDEX_NAME>/_settings' -d '{"number_of_replicas": 2}'
After reducing the number of replicas, take a peek at Kopf to see if all shards have been assigned.
Reason 3: You need to re-enable shard allocation
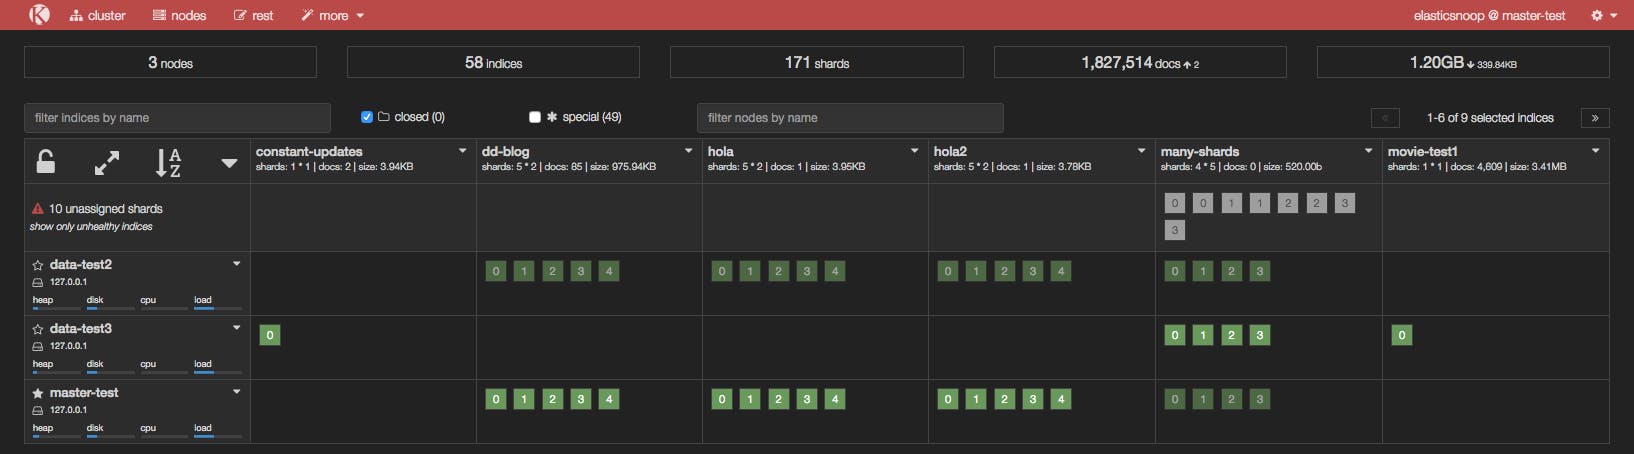
In the Kopf screenshot below, a node has just joined the cluster, but it hasn’t been assigned any shards.
Shard allocation is enabled by default on all nodes, but you may have disabled shard allocation at some point (for example, in order to perform a rolling restart), and forgotten to re-enable it.
To enable shard allocation, update the Cluster Settings API:
curl -XPUT 'localhost:9200/_cluster/settings' -d
'{ "transient":
  { "cluster.routing.allocation.enable" : "all"
  }
}'
If this solved the problem, your Kopf or Datadog dashboard should show the number of unassigned shards decreasing as they are successfully assigned to nodes.
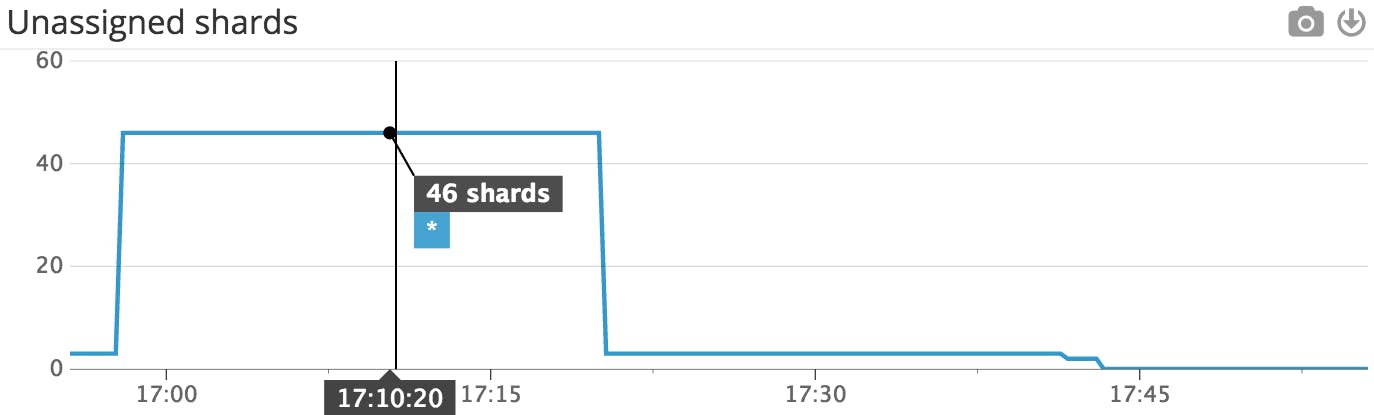 This Datadog timeseries graph shows that the number of unassigned shards decreased after shard allocation was re-enabled.
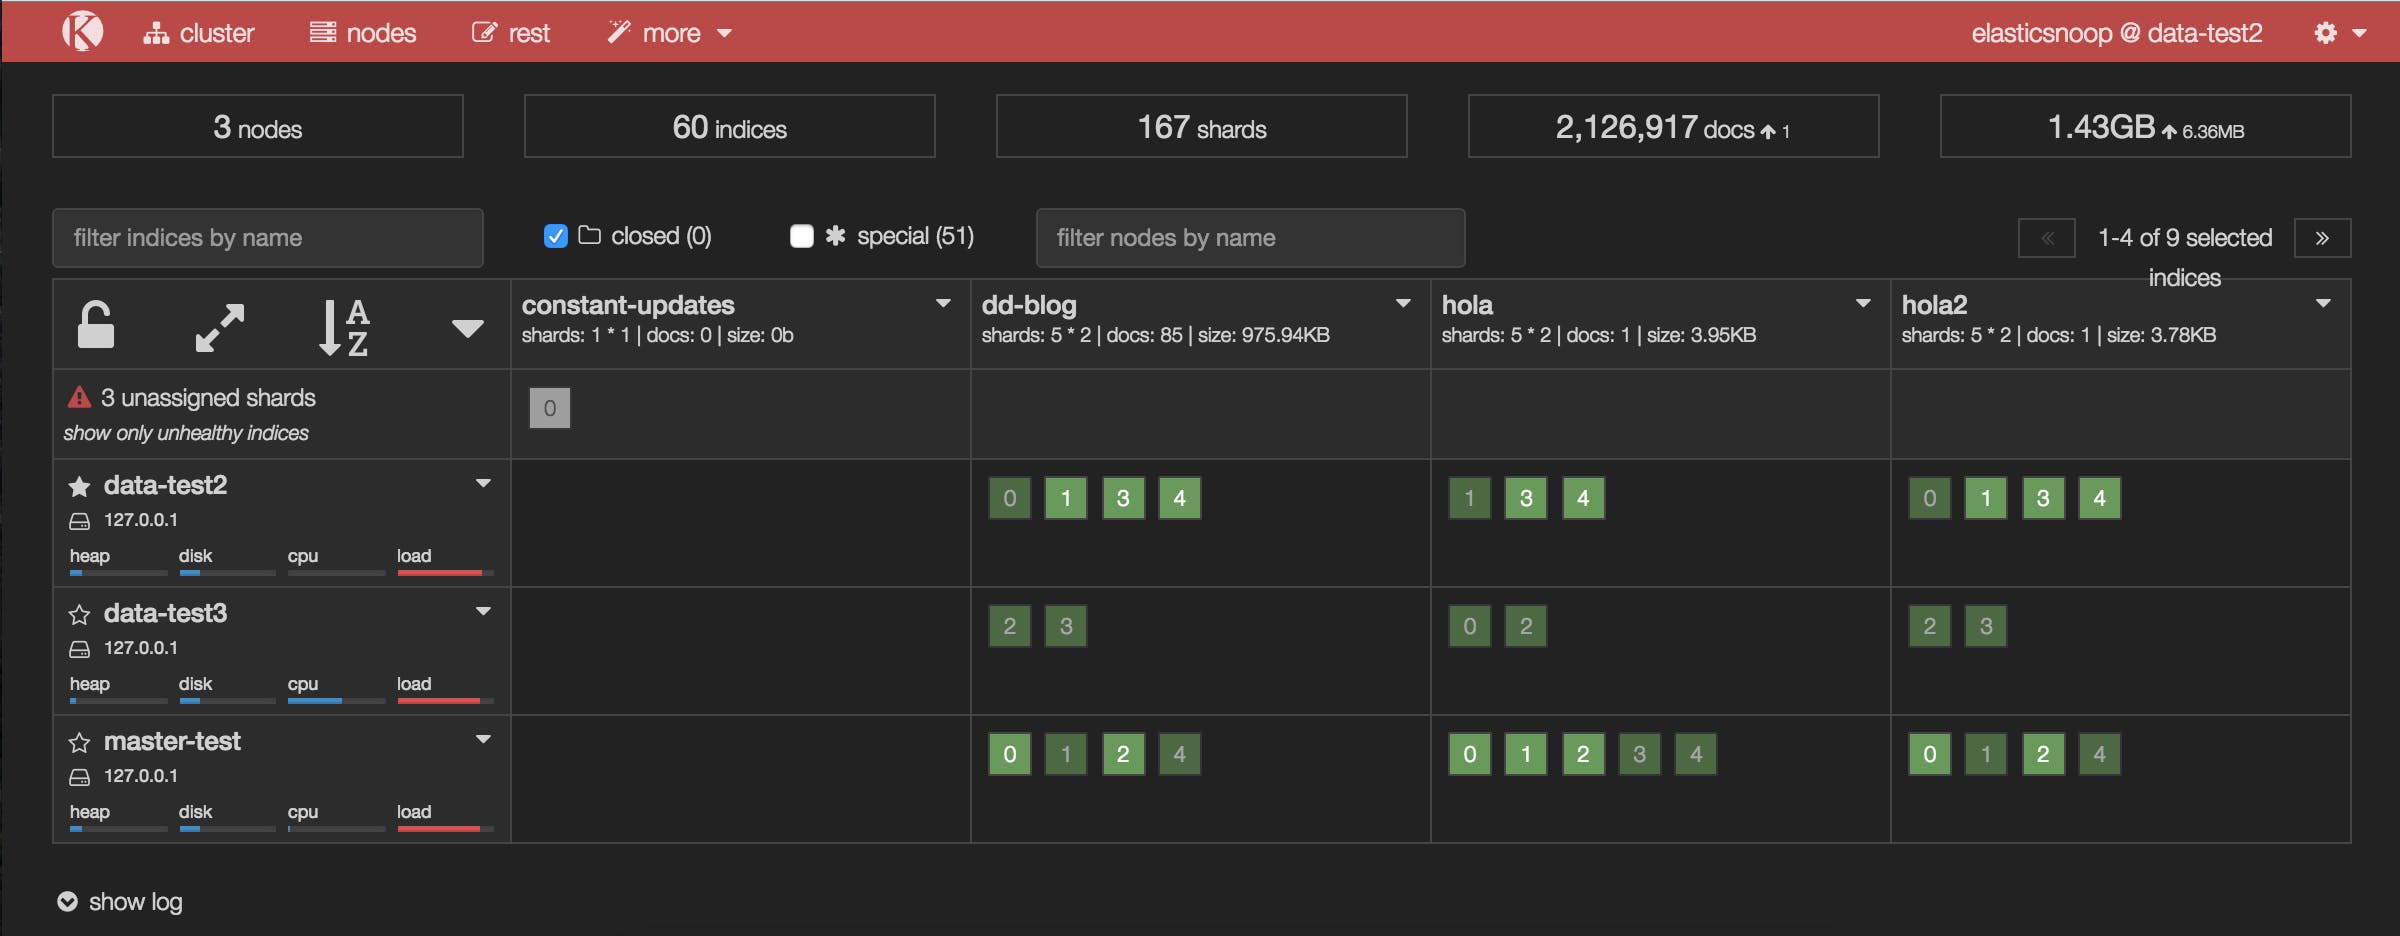 The updated Kopf dashboard shows that many of the previously unassigned shards have been assigned after shard allocation was re-enabled.
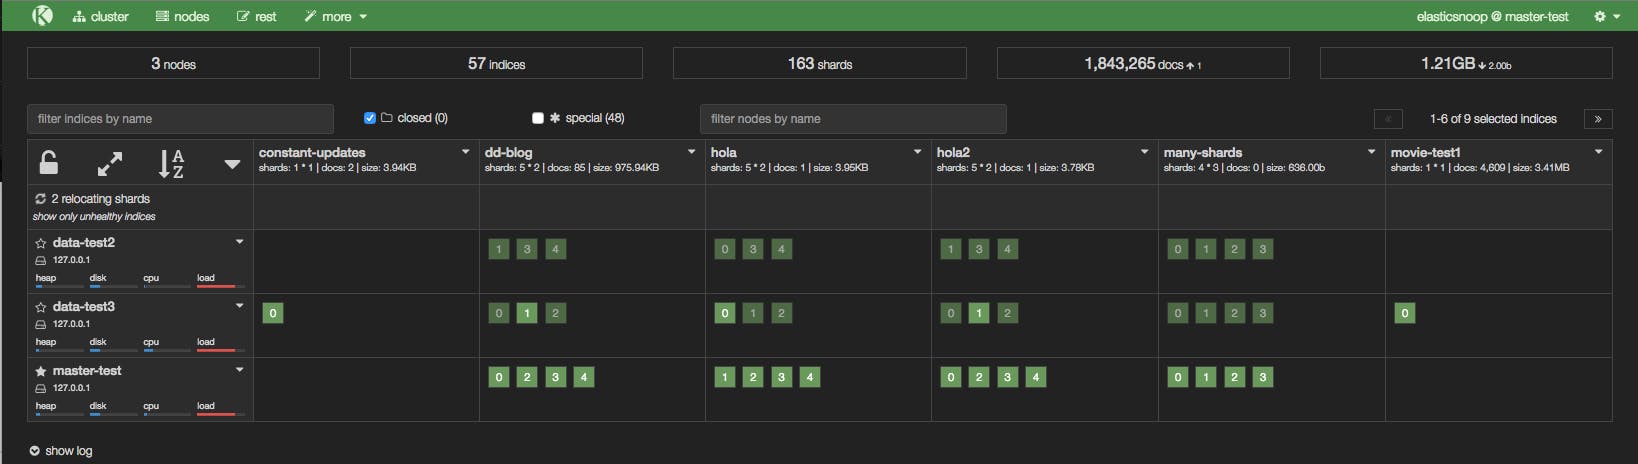
It looks like this solved the issue for all of our unassigned shards, with one exception: shard 0 of the constant-updates index. Let’s explore other possible reasons why the shard remains unassigned.
Reason 4: Shard data no longer exists in the cluster
In this case, primary shard 0 of the constant-updates index is unassigned. It may have been created on a node without any replicas (a technique used to speed up the initial indexing process), and the node left the cluster before the data could be replicated. The master detects the shard in its global cluster state file, but can’t locate the shard’s data in the cluster.
Another possibility is that a node may have encountered an issue while rebooting. Normally, when a node resumes its connection to the cluster, it relays information about its on-disk shards to the master, which then transitions those shards from “unassigned” to “assigned/started”. When this process fails for some reason (e.g. the node’s storage has been damaged in some way), the shards may remain unassigned.
In this scenario, you have to decide how to proceed: try to get the original node to recover and rejoin the cluster (and do not force allocate the primary shard), or force allocate the shard using the Reroute API and reindex the missing data using the original data source, or from a backup.
If you decide to allocate an unassigned primary shard, make sure to add the "allow_primary": "true" flag to the request:
curl -XPOST 'localhost:9200/_cluster/reroute' -d '{ "commands" :
  [ { "allocate" :
      { "index" : "constant-updates", "shard" : 0, "node": "<NODE_NAME>", "allow_primary": "true" }
  }]
}'
Without the "allow_primary": "true" flag, we would have encountered the following error:
{"error":{"root_cause":[{"type":"remote_transport_exception","reason":"[NODE_NAME][127.0.0.1:9301][cluster:admin/reroute]"}],"type":"illegal_argument_exception","reason":"[allocate] trying to allocate a primary shard [constant-updates][0], which is disabled"},"status":400}
The caveat with forcing allocation of a primary shard is that you will be assigning an “empty” shard. If the node that contained the original primary shard data were to rejoin the cluster later, its data would be overwritten by the newly created (empty) primary shard, because it would be considered a “newer” version of the data.
You will now need to reindex the missing data, or restore as much as you can from a backup snapshot using the Snapshot and Restore API.


