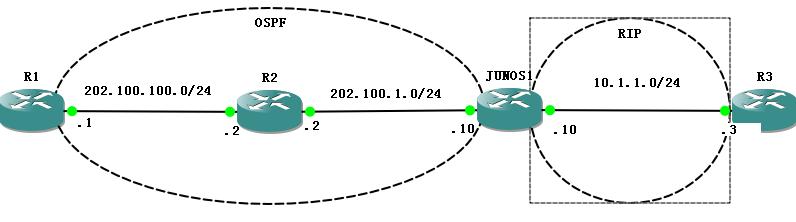
一.测试拓扑:
二.基本配置:
A.R1:
interface Ethernet0/0
ip address 202.100.100.1 255.255.255.0
no shut
ip address 202.100.100.1 255.255.255.0
no shut
interface Loopback0
ip address 1.1.1.1 255.255.255.255
ip address 1.1.1.1 255.255.255.255
B.R2:
interface Ethernet0/0
ip address 202.100.100.2 255.255.255.0
ip address 202.100.100.2 255.255.255.0
no shut
interface Ethernet0/1
ip address 202.100.1.2 255.255.255.0
ip address 202.100.1.2 255.255.255.0
no shut
interface Loopback0
ip address 2.2.2.2 255.255.255.255
ip address 2.2.2.2 255.255.255.255
C.
JUNOS1:
set system root-authentication plain-text-password
set interfaces em0 unit 0 family inet address 202.100.1.10/24
set interfaces em1 unit 0 family inet address 10.1.1.10/24
set interfaces em1 unit 0 family inet address 10.1.1.10/24
D.R3:
interface Ethernet0/0
ip address 10.1.1.3 255.255.255.0
no shut
no shut
interface Loopback0
ip address 3.3.3.3 255.255.255.255
ip address 3.3.3.3 255.255.255.255
三.
JUNOS
静态路由配置:
A.配置方法:
set routing-options static route 0.0.0.0/0 next-hop 202.100.1.2
commit
B.测试:
root> ping 1.1.1.1
PING 1.1.1.1 (1.1.1.1): 56 data bytes
64 bytes from 1.1.1.1: icmp_seq=0 ttl=255 time=51.869 ms
^C
--- 1.1.1.1 ping statistics ---
1 packets transmitted, 1 packets received, 0% packet loss
round-trip min/avg/max/stddev = 51.869/51.869/51.869/nan ms
PING 1.1.1.1 (1.1.1.1): 56 data bytes
64 bytes from 1.1.1.1: icmp_seq=0 ttl=255 time=51.869 ms
^C
--- 1.1.1.1 ping statistics ---
1 packets transmitted, 1 packets received, 0% packet loss
round-trip min/avg/max/stddev = 51.869/51.869/51.869/nan ms
四.RIP动态路由配置:
--junos如果不配置认证,不用配置策略,配置认证,如果不配置策略,接口发出的rip包不会带有认证信息,junos只能接收rip。
A.JUNOS:
①配置策略:
set policy-options policy-statement advertis-routers-through-rip term 1 from protocol direct
set policy-options policy-statement advertis-routers-through-rip term 1 from protocol rip
set policy-options policy-statement advertis-routers-through-rip term 1 then accept
set policy-options policy-statement advertis-routers-through-rip term 1 from protocol rip
set policy-options policy-statement advertis-routers-through-rip term 1 then accept
②配置接口,将接口加入group
set protocols rip group rip-group neighbor em1.0
③group export策略
set protocols rip group rip-group export advertis-routers-through-rip
④配置认证
全局:
set protocols rip authentication-type md5
set protocols rip authentication-key cisco
set protocols rip authentication-key cisco
接口:
set protocols rip group rip-group neighbor em1.0 authentication-type md5
set protocols rip group rip-group neighbor em1.0 authentication-key cisco
set protocols rip group rip-group neighbor em1.0 authentication-key cisco
B.R2:
①基本配置:
router rip
version 2
network 10.0.0.0
network 192.168.1.0
version 2
network 10.0.0.0
network 192.168.1.0
②配置认证:
key chain rip
key 1
key-string cisco
interface Ethernet0/0
ip rip authentication mode md5
ip rip authentication key-chain rip
key 1
key-string cisco
interface Ethernet0/0
ip rip authentication mode md5
ip rip authentication key-chain rip
备注:测试时发现用c2691-adventerprisek9-mz.124-15.T14.BIN的2691的路由器配置完rip认证后,rip包中不会有认证信息,可能是IOS的问题。
C.验证:
root# run show route
inet.0: 7 destinations, 7 routes (7 active, 0 holddown, 0 hidden)
+ = Active Route, - = Last Active, * = Both
3.0.0.0/8 *[RIP/100] 00:09:09, metric 2, tag 0
> to 10.1.1.3 via em1.0
10.1.1.0/24 *[Direct/0] 00:28:05
> via em1.0
10.1.1.10/32 *[Local/0] 00:28:05
Local via em1.0
13.0.0.0/8 *[RIP/100] 00:09:09, metric 2, tag 0
> to 10.1.1.3 via em1.0
202.100.1.0/24 *[Direct/0] 00:28:05
> via em0.0
202.100.1.10/32 *[Local/0] 00:28:05
Local via em0.0
224.0.0.9/32 *[RIP/100] 00:01:10, metric 1
MultiRecv
inet.0: 7 destinations, 7 routes (7 active, 0 holddown, 0 hidden)
+ = Active Route, - = Last Active, * = Both
3.0.0.0/8 *[RIP/100] 00:09:09, metric 2, tag 0
> to 10.1.1.3 via em1.0
10.1.1.0/24 *[Direct/0] 00:28:05
> via em1.0
10.1.1.10/32 *[Local/0] 00:28:05
Local via em1.0
13.0.0.0/8 *[RIP/100] 00:09:09, metric 2, tag 0
> to 10.1.1.3 via em1.0
202.100.1.0/24 *[Direct/0] 00:28:05
> via em0.0
202.100.1.10/32 *[Local/0] 00:28:05
Local via em0.0
224.0.0.9/32 *[RIP/100] 00:01:10, metric 1
MultiRecv
R3#show ip route rip
R 202.100.1.0/24 [120/1] via 10.1.1.10, 00:00:19, Ethernet0/0
五.OSPF动态路由配置:
R 202.100.1.0/24 [120/1] via 10.1.1.10, 00:00:19, Ethernet0/0
五.OSPF动态路由配置:
A.R1:
router ospf 1
router-id 1.1.1.1
network 202.100.100.1 0.0.0.0 area 0
router-id 1.1.1.1
network 202.100.100.1 0.0.0.0 area 0
network 1.1.1.1 0.0.0.0 a 0
interface Ethernet0/0
ip ospf authentication message-digest
ip ospf message-digest-key 1 md5 cisco
ip ospf authentication message-digest
ip ospf message-digest-key 1 md5 cisco
---链路认证
B.R2:
router ospf 1
router-id 2.2.2.2
area 0 authentication message-digest
network 202.100.1.2 0.0.0.0 area 0
network 202.100.100.2 0.0.0.0 area 0
router-id 2.2.2.2
area 0 authentication message-digest
network 202.100.1.2 0.0.0.0 area 0
network 202.100.100.2 0.0.0.0 area 0
interface Ethernet0/0
ip ospf message-digest-key 1 md5 cisco
interface Ethernet0/1
ip ospf message-digest-key 1 md5 cisco
ip ospf message-digest-key 1 md5 cisco
interface Ethernet0/1
ip ospf message-digest-key 1 md5 cisco
---区域认证
C.JUNOS:
set protocols ospf area 0.0.0.0 interface em0.0 authentication md5 1 key cisco
D:验证:
root# run show ospf neighbor
Address Interface State ID Pri Dead
202.100.1.2 em0.0 Full 2.2.2.2 1 32
Address Interface State ID Pri Dead
202.100.1.2 em0.0 Full 2.2.2.2 1 32
root# run show route protocol ospf
inet.0: 10 destinations, 10 routes (10 active, 0 holddown, 0 hidden)
+ = Active Route, - = Last Active, * = Both
1.1.1.1/32 *[OSPF/10] 00:00:04, metric 12
> to 202.100.1.2 via em0.0
202.100.100.0/24 *[OSPF/10] 04:48:10, metric 11
> to 202.100.1.2 via em0.0
224.0.0.5/32 *[OSPF/10] 04:48:22, metric 1
MultiRecv
inet.0: 10 destinations, 10 routes (10 active, 0 holddown, 0 hidden)
+ = Active Route, - = Last Active, * = Both
1.1.1.1/32 *[OSPF/10] 00:00:04, metric 12
> to 202.100.1.2 via em0.0
202.100.100.0/24 *[OSPF/10] 04:48:10, metric 11
> to 202.100.1.2 via em0.0
224.0.0.5/32 *[OSPF/10] 04:48:22, metric 1
MultiRecv
六.OSPF和rip双向路由重分布配置:
A.RIP往OSPF:
①配置策略:
set policy-options policy-statement into-ospf term rip-to-ospf from protocol rip
set policy-options policy-statement into-ospf term rip-to-ospf from route-filter 3.0.0.0/8 exact
set policy-options policy-statement into-ospf term rip-to-ospf then accept
set policy-options policy-statement into-ospf term rip-to-ospf from route-filter 3.0.0.0/8 exact
set policy-options policy-statement into-ospf term rip-to-ospf then accept
set policy-options policy-statement into-ospf term direct-to-ospf from protocol direct
set policy-options policy-statement into-ospf term direct-to-ospf from route-filter 10.1.1.0/24 exact
set policy-options policy-statement into-ospf term direct-to-ospf then accept
set policy-options policy-statement into-ospf then reject
②调用策略:
set protocols ospf export into-ospf
③验证:
R1#show ip route ospf
O E2 3.0.0.0/8 [110/2] via 202.100.100.2, 00:07:57, Ethernet0/0
O 202.100.1.0/24 [110/20] via 202.100.100.2, 00:10:49, Ethernet0/0
10.0.0.0/24 is subnetted, 1 subnets
O E2 10.1.1.0 [110/0] via 202.100.100.2, 00:00:04, Ethernet0/0
O E2 3.0.0.0/8 [110/2] via 202.100.100.2, 00:07:57, Ethernet0/0
O 202.100.1.0/24 [110/20] via 202.100.100.2, 00:10:49, Ethernet0/0
10.0.0.0/24 is subnetted, 1 subnets
O E2 10.1.1.0 [110/0] via 202.100.100.2, 00:00:04, Ethernet0/0
B.
OSPF
往
RIP
:
①配置策略:
set policy-options policy-statement into-rip term ospf-to-rip from protocol ospf
set policy-options policy-statement into-rip term ospf-to-rip from route-filter 202.100.100.0/24 exact
set policy-options policy-statement into-rip term ospf-to-rip from route-filter 1.1.1.1/32 exact
set policy-options policy-statement into-rip term ospf-to-rip then accept
set policy-options policy-statement into-rip term direct-to-rip from protocol direct
set policy-options policy-statement into-rip term direct-to-rip from route-filter 202.100.1.0/24 exact
set policy-options policy-statement into-rip term direct-to-rip then accept
set policy-options policy-statement into-rip then reject
set policy-options policy-statement into-rip term ospf-to-rip from route-filter 202.100.100.0/24 exact
set policy-options policy-statement into-rip term ospf-to-rip from route-filter 1.1.1.1/32 exact
set policy-options policy-statement into-rip term ospf-to-rip then accept
set policy-options policy-statement into-rip term direct-to-rip from protocol direct
set policy-options policy-statement into-rip term direct-to-rip from route-filter 202.100.1.0/24 exact
set policy-options policy-statement into-rip term direct-to-rip then accept
set policy-options policy-statement into-rip then reject
②调用策略:
set protocols rip group rip-group export into-rip
③验证:
R3#show ip route rip
1.0.0.0/32 is subnetted, 1 subnets
R 1.1.1.1 [120/1] via 10.1.1.10, 00:00:24, Ethernet0/0
R 202.100.100.0/24 [120/1] via 10.1.1.10, 00:00:24, Ethernet0/0
R 202.100.1.0/24 [120/1] via 10.1.1.10, 00:00:24, Ethernet0/0
1.0.0.0/32 is subnetted, 1 subnets
R 1.1.1.1 [120/1] via 10.1.1.10, 00:00:24, Ethernet0/0
R 202.100.100.0/24 [120/1] via 10.1.1.10, 00:00:24, Ethernet0/0
R 202.100.1.0/24 [120/1] via 10.1.1.10, 00:00:24, Ethernet0/0
本文转自 碧云天 51CTO博客,原文链接:http://blog.51cto.com/333234/1355447,如需转载请自行联系原作者