CentOS 7.2配置Apache服务httpd(下)

简介: CentOS 7.2配置Apache服务httpd(下)


 一、Perl + mod_perl

安装mod_perl使Perl脚本速度快

?

1

2

3

4

5

6

7

8

9

10

11

12

13

14

15

16

17

18

19

20

21

22

23

24

25

26

27

28

29

30

31

32

33

34

35

36

37

38

39

40

41

42

43

44

45

46

47

48

49

50

51

52

53

54

55

56

57

58

59

60

61

62

63

64

65

66

67

[1] 安装mod_perl

# 从EPEL安装

[root@linuxprobe ~]# yum --enablerepo=epel -y install mod_perl

[2] 配置PerlRun模式,总是将Perl解释器放在RAM上。

[root@linuxprobe ~]# vi /etc/httpd/conf.d/perl.conf

# line 15: 取消注释 ( check codes and output warnings to logs )


PerlSwitches -w

# line 24: 取消注释


PerlSwitches -T

# line 30-36: 取消注释像下面一样


Alias /perl /var/www/perl

<Directory /var/www/perl# the directory for mod_perl environment


  SetHandler perl-script # processes files as perl-scripts under this directory


#  AddHandler perl-script .cgi

# set specific extension if do do not want to processes all files as CGI


#  PerlResponseHandler ModPerl::Registry

  PerlResponseHandler ModPerl::PerlRun

# specify PerlRun mode


  PerlOptions +ParseHeaders

  Options +ExecCGI

</Directory>

# line 43-49: 取消注释并添加如下信息


<Location /perl-status>

  SetHandler perl-script

  PerlResponseHandler Apache2::Status

  Require ip 127.0.0.1 10.1.1.1/24

# add access permission


#  Order deny,allow

#  Deny from all

#  Allow from .example.com

</Location>

[root@linuxprobe ~]# systemctl restart httpd


[3] 创建测试脚本以确保设置不是ploblem。如果显示如下所示的结果,就可以。

[root@linuxprobe ~]# mkdir /var/www/perl

[root@linuxprobe ~]# vi /var/www/perl/test-mod_perl.cgi


#!/usr/bin/perl


use strict;

use warnings;


print "Content-type: text/html\n\n";

print "<html>\n<body>\n";

print "<div style=\"width:100%; font-size:40px; font-weight:bold; text-align:center;\">";


my $a = 0;

&number();


print "</div>\n</body>\n</html>";


sub number {

  $a++;

  print "number \$a = $a";

}


[root@linuxprobe ~]# chmod 705 /var/www/perl/test-mod_perl.cgi

#客户端浏览器访问:http://linuxprobe.org/perl/test-mod_perl.cgi

[4]  配置在RAM上具有代码缓存的注册表模式

?

1

2

3

4

5

6

7

8

9

10

11

12

13

[root@linuxprobe ~]# vi /etc/httpd/conf.d/perl.conf

Alias /perl /var/www/perl

<Directory /var/www/perl>

  SetHandler perl-script

  PerlResponseHandler ModPerl::Registry # uncomment


#

  PerlResponseHandler ModPerl::PerlRun # comment out


  PerlOptions +ParseHeaders

  Options +ExecCGI

</Directory>

[root@linuxprobe ~]# systemctl restart httpd

[5] 访问作为[4]节的示例的测试脚本,然后变量通过重新加载而增加,因为变量被高速缓存在RAM上。所以有必要编辑注册表模式的代码,这里浏览器没刷新一次,$a值加一。

?

1

2

3

4

5

6

7

8

9

10

11

12

13

14

15

16

17

18

19

20

21

22

23

24

25

[root@linuxprobe ~]# vi /var/www/perl/test-mod_perl.cgi


#!/usr/bin/perl


use strict;

use warnings;


print "Content-type: text/html\n\n";

print "<html>\n<body>\n";

print "<div style=\"width:100%; font-size:40px; font-weight:bold; text-align:center;\">";


my $a = 0;


&number($a

);


print "</div>\n</body>\n</html>";


sub number {


  my($a) = @_;


  $a++;

  print "number \$a = $a";

}

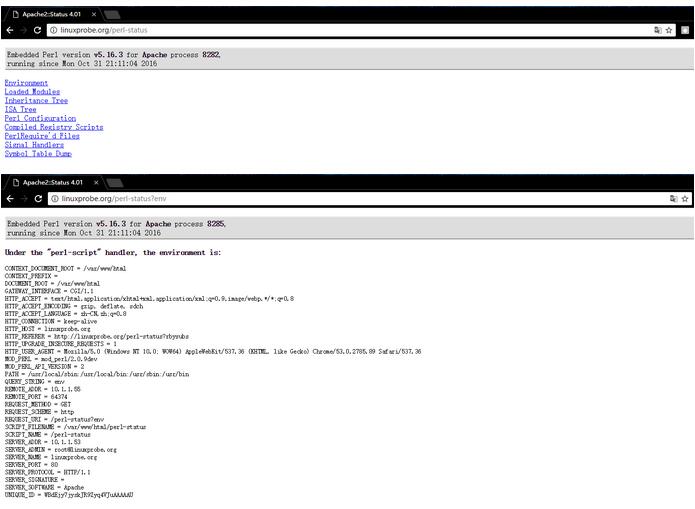
[6]顺便说一下,可以看到mod_perl的状态来访问“http://(主机名或IP地址)/ perl-status”。
二、PHP + PHP-FPM

安装PHP-FPM使PHP脚本速度快

?

1

2

3

4

5

6

7

8

9

10

11

12

13

14

15

16

17

18

[1]安装PHP,请参考这里。  

[2]安装PHP-FPM。 

[root@linuxprobe ~]# yum -y install php-fpm

[3]   配置Apache httpd。

[root@linuxprobe ~]# vi /etc/httpd/conf.d/php.conf

# line 5: change like follows

<FilesMatch \.php$>

#

  SetHandler application/x-httpd-php

  SetHandler "proxy:fcgi://127.0.0.1:9000"


</FilesMatch>

[root@linuxprobe ~]# systemctl start php-fpm

[root@linuxprobe ~]# systemctl enable php-fpm

[root@linuxprobe ~]# systemctl restart httpd


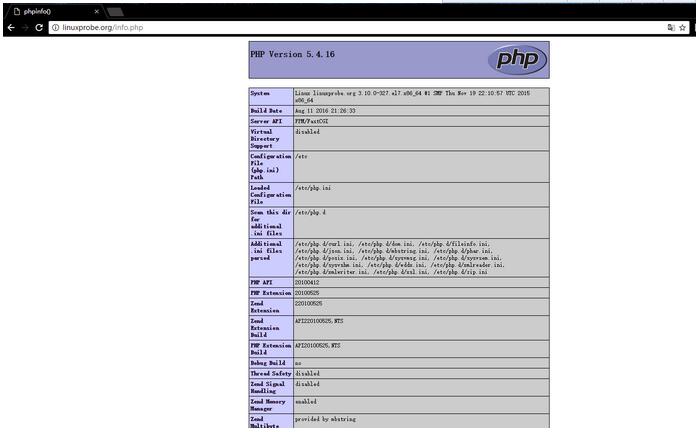
[4]创建phpinfo并访问它,然后如果“FPM / FastCGI”显示,它是确定。 

[root@linuxprobe ~]# echo '<?php phpinfo(); ?>' > /var/www/html/info.php

三、Python + mod_wsgi

安装mod_wsgi(WSGI:Web服务器网关接口),使Python脚本更快

?

1

2

3

4

5

6

7

8

9

10

11

12

13

14

15

16

17

18

19

20

21

22

23

24

25

[1] 安装mod_wsgi .

[root@linuxprobe ~]# yum -y install mod_wsgi

[2] 例如,将mod_wsgi配置为可以访问/ test_wsgi,后端是/var/www/html/test_wsgi.py.

[root@linuxprobe ~]# vi /etc/httpd/conf.d/wsgi.conf

# create new


WSGIScriptAlias /test_wsgi /var/www/html/test_wsgi.py

[root@linuxprobe ~]# systemctl restart httpd


[3] 创建您在上面设置的测试脚本.

[root@linuxprobe ~]# vi /var/www/html/test_wsgi.py

# create new


def application(environ,start_response):

  status = '200 OK'

  html = '<html>\n' \

      '<body>\n' \

      '<div style="width: 100%; font-size: 40px; font-weight: bold; text-align: center;">\n' \

      'mod_wsgi Test Page\n' \

      '</div>\n' \

      '</body>\n' \

      '</html>\n'

  response_header = [('Content-type','text/html')]

  start_response(status,response_header)

  return [html]

?

1

2

3

4

5

6

7

8

9

10

11

12

13

14

[4]配置如果你使用Django。 ([参考安装Django](http://blog.csdn.net/wh211212/article/details/52992413))例如,在“wang”下拥有的“/home/wang/ venv/testproject”下配置“testapp”


[root@linuxprobe ~]# vi /etc/httpd/conf.d/django.conf

# create new


WSGIDaemonProcess testapp python-path=/home/wang/venv/testproject:/home/wang/venv/lib/python2.7/site-packages

WSGIProcessGroup testapp

WSGIScriptAlias /django /home/wang/venv/testproject/testproject/wsgi.py


<Directory /home/wang/venv/testproject>

  Require all granted

</Directory>


[root@linuxprobe ~]# systemctl restart httpd

四、访问日志分析器:AWstats

安装AWstats,它报告http日志以分析对http服务器的访问。

[1] 安装AWstats。  

?

1

2

3

4

5

6

7

8

9

10

11

12

13

14

15

16

17

18

19

20

21

22

23

24

25

26

27

28

29

30

31

32

33

34

35

# install from EPEL

[root@linuxprobe ~]# yum --enablerepo=epel -y install awstats

# awstats.(hostname).conf是自动生成的

[root@linuxprobe ~]# vi /etc/awstats/awstats.linuxprobe.org.conf

# line 122: change

# if your config for log format in httpd.conf is 'combined' Set here '1'

# If log-config is 'common' set here '4', but in this case, some informations can't be get (browser info and so on)

LogFormat=1

# line 153: specify your hostname

SiteDomain="linuxprobe.org

# line 168: set IP address you'd like to exclude

HostAliases="localhost 127.0.0.1 REGEX[server\.world$] REGEX[^10\.1\.1\.]

"

[root@linuxprobe ~]# vi /etc/httpd/conf.d/awstats.conf

# line 30: IP address you permit to access

Require ip 10.1.1.0/24


[root@linuxprobe ~]# systemctl restart httpd

# generate reports ( reports are updated for hourly by Cron )


[root@linuxprobe ~]# /usr/share/awstats/linuxproberoot/cgi-bin/awstats.pl -config=linuxprobe.org -update


Create/Update database for config "/etc/awstats/awstats.linuxprobe.org.conf" by AWStats version 7.4 (build 20150714)

From data in log file "/var/log/httpd/access_log"...

Phase 1 : First bypass old records, searching new record...

Searching new records from beginning of log file...

Phase 2 : Now process new records (Flush history on disk after 20000 hosts)...

Jumped lines in file: 0

Parsed lines in file: 165

 Found 0 dropped records,

 Found 0 comments,

 Found 0 blank records,

 Found 0 corrupted records,

 Found 0 old records,

 Found 165 new qualified records.

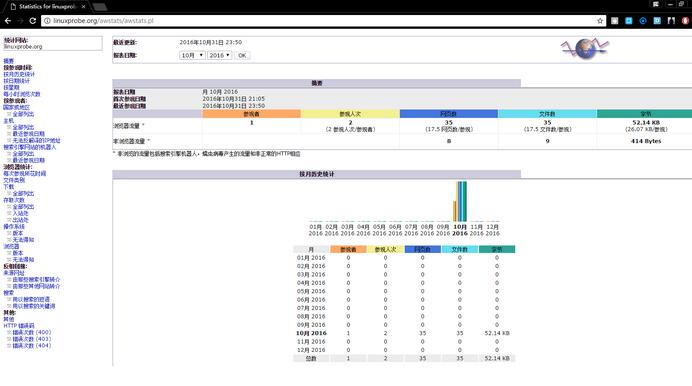
[2]访问“http://(您的服务器的名称或IP地址/)/awstats/awstats.pl”,然后显示以下屏幕,可以看到httpd日志报告。
以上就是本文的全部内容,希望对大家的学习有所帮助。


目录
相关文章
|
存储 缓存 算法
分布式锁服务深度解析:以Apache Flink的Checkpointing机制为例
【10月更文挑战第7天】在分布式系统中,多个进程或节点可能需要同时访问和操作共享资源。为了确保数据的一致性和系统的稳定性,我们需要一种机制来协调这些进程或节点的访问,避免并发冲突和竞态条件。分布式锁服务正是为此而生的一种解决方案。它通过在网络环境中实现锁机制,确保同一时间只有一个进程或节点能够访问和操作共享资源。
672 3
|
存储 分布式计算 druid
大数据-152 Apache Druid 集群模式 配置启动【下篇】 超详细!(一)
394 1
大数据-152 Apache Druid 集群模式 配置启动【下篇】 超详细!(一)
|
缓存 前端开发 应用服务中间件
CORS跨域+Nginx配置、Apache配置
957 7
|
存储 分布式计算 druid
大数据-155 Apache Druid 架构与原理详解 数据存储 索引服务 压缩机制
370 3
apache+tomcat配置多站点集群的方法
277 4
|
消息中间件 分布式计算 druid
大数据-152 Apache Druid 集群模式 配置启动【下篇】 超详细!(二)
250 2
|
负载均衡 应用服务中间件 Apache
Tomcat负载均衡原理详解及配置Apache2.2.22+Tomcat7
357 3
|
存储 消息中间件 druid
大数据-151 Apache Druid 集群模式 配置启动【上篇】 超详细!
386 1
|
Linux 应用服务中间件 nginx
CentOS7 自定义服务
服务配置 服务配置主目录存放路径 # cd /usr/lib/systemd/system 文件内容格式 [Unit]:服务的说明 Description:描述服务 After:在哪些描述服务类别之后启动 [Service]服务运行参数的设...
1032 0